When I first attempted to make a French omelette, I thought it would be as simple as scrambling some eggs. Boy, was I wrong! This seemingly basic dish humbled me quickly, but it also became one of my favorite culinary challenges. The French omelette isn’t just any ordinary egg dish – it’s a testament to technique, patience, and the beauty of simplicity done right.
Unlike its American cousin that’s thick, fluffy, and often stuffed with various ingredients, the French omelette is a study in elegance. It’s pale golden, creamy throughout, and shaped like a perfect oval pillow. The texture should be so silky that it practically melts on your tongue, with curds so fine they’re almost imperceptible.
Understanding the French Omelette
Classic French Omelette (Omelette Nature) : The traditional version made with just eggs, butter, and salt, showcasing pure technique and the quality of ingredients.
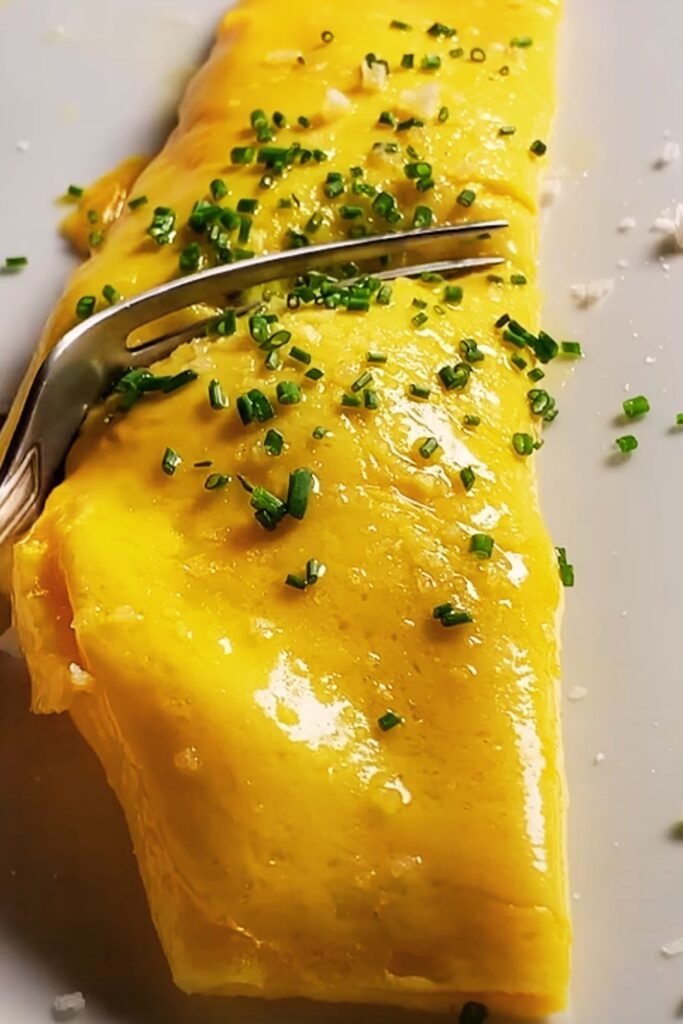
Herb Omelette (Omelette aux Fines Herbes) : Enhanced with finely chopped fresh herbs like chives, parsley, tarragon, and chervil, adding subtle flavor complexity.
Filled Omelette (Omelette Garnie) : Contains various fillings such as cheese, mushrooms, or ham, though these are added sparingly to maintain the dish’s delicate nature.
Temperature Control : The critical element that determines success, requiring gentle, consistent heat throughout the cooking process.
The key difference between a French omelette and other styles lies in the cooking method. While American omelettes are cooked over medium heat and allowed to set firmly, French omelettes are cooked over very low heat with constant stirring, creating an almost custard-like consistency.
Essential Ingredients and Equipment
Core Ingredients
The beauty of a French omelette lies in its simplicity, which means every ingredient must be of the highest quality:
| Ingredient | Quantity (per omelette) | Quality Notes | Purpose |
|---|---|---|---|
| Fresh Eggs | 2-3 large eggs | Free-range, room temperature | Provides structure and richness |
| Unsalted Butter | 1-2 tablespoons | European-style, high fat content | Creates creaminess and prevents sticking |
| Fine Sea Salt | Pinch | Fleur de sel or kosher salt | Enhances flavor without overpowering |
| Fresh Herbs (optional) | 1 teaspoon chopped | Chives, parsley, tarragon | Adds subtle aromatic complexity |
Equipment Essentials
The right tools make all the difference in achieving omelette perfection:
| Tool | Size/Type | Why It Matters |
|---|---|---|
| Non-stick Pan | 8-inch diameter | Ensures easy release and even heating |
| Rubber Spatula | Heat-resistant | Gentle stirring without scratching |
| Fine Mesh Whisk | Small size | Creates smooth egg mixture |
| Small Bowl | Glass or ceramic | For beating eggs |
| Warm Plate | Room temperature | Prevents omelette from cooling too quickly |

Step-by-Step French Omelette Technique
Preparation Phase
Before I even crack an egg, I ensure everything is ready. The French omelette waits for no one – once you start cooking, you’re committed to the process.
First, I crack my eggs into a small bowl and examine them. The yolks should be bright orange-yellow, standing tall without spreading. Room temperature eggs incorporate better and cook more evenly than cold ones, so I remove them from the refrigerator about 30 minutes before cooking.
Using a fine whisk, I beat the eggs just until the yolks and whites are completely combined. I’m not trying to incorporate air here – that would create bubbles that interfere with the smooth texture I’m after. The mixture should be uniform in color with no streaks of white.
The Cooking Process
I place my 8-inch non-stick pan over the lowest possible heat setting. This is crucial – high heat is the enemy of a proper French omelette. While the pan warms (which takes about 2-3 minutes), I add a pinch of salt to my beaten eggs and give them one final gentle stir.
Here’s where patience becomes essential. I add one tablespoon of butter to the warm pan, watching it melt slowly without sizzling or browning. If it sizzles, my heat is too high. The butter should melt gently, coating the entire bottom of the pan.
Once the butter has melted completely, I pour in my beaten eggs. They should not sizzle when they hit the pan. Using my rubber spatula, I immediately begin stirring in small circles, starting from the center and working outward. This constant motion prevents the eggs from setting too quickly in any one spot.
The Critical Stirring Phase
For the next 3-4 minutes, I maintain constant, gentle stirring. The eggs will gradually begin to thicken, taking on a creamy, custard-like consistency. I can see small curds forming, but they should be so fine they’re barely visible. If large curds start forming, my heat is too high.
During this phase, I occasionally lift the pan from the heat for a few seconds, continuing to stir. This temperature control is what separates a good French omelette from a great one. The eggs should never fully set – they should remain creamy and just slightly loose.
Shaping and Finishing
When the eggs have thickened to a creamy consistency but still jiggle slightly when I shake the pan, it’s time to shape the omelette. I stop stirring and let the eggs set for about 30 seconds, just long enough for the bottom to barely firm up.
Using my spatula, I gently fold the omelette in half, creating that classic oval shape. The fold should be smooth and natural – I’m not forcing it. If the eggs are still too loose, I can let them cook for another 15-20 seconds before folding.
The final step is sliding the omelette onto a warm plate. I tilt the pan and use my spatula to guide the omelette out, seam-side down. A properly made French omelette should have a pale golden exterior with no brown spots whatsoever.
Temperature and Timing Mastery
Understanding Heat Levels
Temperature control is absolutely critical for French omelette success. I’ve learned that what feels like “barely warm” to my hand is perfect for egg cookery. Here’s my temperature guide:
| Heat Level | Visual Cues | Egg Behavior | Result |
|---|---|---|---|
| Too High | Butter sizzles immediately | Eggs bubble and set quickly | Tough, rubbery texture |
| Just Right | Butter melts slowly, no sound | Eggs thicken gradually | Creamy, custard-like texture |
| Too Low | Butter barely melts | Eggs remain liquid too long | Loose, unset omelette |
Timing Breakdown
The entire process should take 6-8 minutes from start to finish:
- Pan heating: 2-3 minutes
- Egg cooking and stirring: 3-4 minutes
- Final setting and folding: 30-60 seconds
- Plating: 15 seconds
I’ve found that rushing any part of this process leads to disappointment. The French omelette rewards patience and gentle technique over speed.
Flavor Variations and Enhancements
Classic Herb Omelette (Omelette aux Fines Herbes)
My personal favorite variation incorporates fresh herbs. I use what the French call “fines herbes” – a classic combination of:
- Fresh chives (finely chopped)
- Italian parsley (minced)
- Fresh tarragon (chopped)
- Chervil (when available)
I add these herbs to my beaten eggs just before cooking, using about 1 teaspoon total per omelette. The herbs should be chopped very finely so they distribute evenly throughout the eggs.
Cheese Variations
When I want to add cheese, I choose varieties that melt easily and complement rather than overpower the eggs:
| Cheese Type | Amount | When to Add | Flavor Profile |
|---|---|---|---|
| Gruyère | 1 tablespoon grated | During final 30 seconds | Nutty, complex |
| Fresh Goat Cheese | 1 teaspoon crumbled | Just before folding | Tangy, creamy |
| Chives and Cream Cheese | 1 teaspoon | Mixed with herbs | Mild, rich |
Savory Additions
For heartier variations, I sometimes include:
- Sautéed mushrooms (cooled to room temperature)
- Fresh crab meat (picked clean of shells)
- Smoked salmon (torn into small pieces)
- Caramelized onions (very finely chopped)
The key is using these additions sparingly – no more than 1-2 tablespoons total. They should enhance, not dominate, the delicate egg base.

Common Mistakes and Solutions
Problem: Rubbery Texture
Cause: Heat too high or overcooking Solution: Lower heat significantly and cook more slowly. The eggs should never bubble or sizzle aggressively.
Problem: Large, Uneven Curds
Cause: Insufficient stirring or uneven heat Solution: Maintain constant, gentle stirring and ensure even pan heating before adding eggs.
Problem: Brown or Spotted Exterior
Cause: Excessive heat or browning of butter Solution: Keep heat very low and watch butter carefully – it should never brown.
Problem: Too Loose or Runny
Cause: Insufficient cooking time or heat too low Solution: Cook a bit longer while stirring, or slightly increase heat while maintaining gentle technique.
Problem: Difficulty Folding
Cause: Eggs either overcooked (too set) or undercooked (too liquid) Solution: Practice timing – eggs should be just set enough to hold their shape when folded.
Nutritional Benefits and Considerations
French omelettes offer excellent nutritional value in a relatively small package:
| Nutrient | Amount (per 2-egg omelette) | Daily Value % | Benefits |
|---|---|---|---|
| Protein | 12-15g | 24-30% | Complete amino acid profile |
| Healthy Fats | 14-18g | Variable | Essential fatty acids, vitamin absorption |
| Vitamin B12 | 1.5μg | 60% | Nervous system health |
| Choline | 250mg | 45% | Brain function, memory |
| Selenium | 22μg | 40% | Antioxidant properties |
| Vitamin D | 80 IU | 20% | Bone health, immune function |
The high-quality protein in eggs provides all essential amino acids in ideal proportions. The fats, primarily from the egg yolks and butter, help with satiety and the absorption of fat-soluble vitamins.
Serving Suggestions and Pairings
Traditional French Accompaniments
In France, I’ve learned that omelettes are often served simply, allowing the technique and egg quality to shine:
- Fresh baguette slices: Lightly toasted with unsalted butter
- Mixed green salad: Dressed with simple vinaigrette
- Fresh fruit: Seasonal selections like pears or berries
- Herbed butter: Compound butter with fresh herbs
Modern Serving Ideas
For contemporary presentations, I like to pair French omelettes with:
- Roasted vegetables: Asparagus, cherry tomatoes, or bell peppers
- Avocado slices: With a sprinkle of flaky salt and pepper
- Microgreens: For color and subtle flavor
- Hash browns: Crispy potatoes as a contrasting texture
Beverage Pairings
The delicate flavor of French omelettes pairs beautifully with:
- Fresh orange juice: Classic breakfast pairing
- Coffee or espresso: The richness complements egg dishes
- Herbal teas: Chamomile or mint for lighter meals
- Sparkling water: With lemon for a refreshing contrast
Storage and Reheating Guidelines
While French omelettes are best enjoyed immediately after cooking, sometimes planning ahead is necessary:
Short-term Storage
- Room temperature: Up to 1 hour maximum
- Refrigerated: Up to 24 hours in sealed container
- Not recommended: Freezing (texture becomes unacceptable)
Reheating Methods
| Method | Temperature | Time | Quality Result |
|---|---|---|---|
| Microwave | 50% power | 30-45 seconds | Fair (texture changes) |
| Low pan heat | Lowest setting | 2-3 minutes | Good (gentle warming) |
| Warm oven | 200°F | 5-7 minutes | Best (even heating) |
I must emphasize that reheated omelettes never quite match the original texture, so I always prefer making them fresh when possible.
Advanced Techniques and Professional Tips
The Professional Flip Method
Advanced cooks sometimes use a flipping technique rather than folding. This requires significant practice and should only be attempted after mastering the basic fold method.
Sauce Integration
Some chefs incorporate sauces directly into the omelette:
- Hollandaise: Added in tiny amounts during stirring
- Cream sauces: Reduced and cooled before incorporation
- Herb oils: Drizzled during the final stages
Presentation Techniques
For elegant presentation, I sometimes:
- Score the surface lightly with a knife for professional appearance
- Brush with clarified butter for extra shine
- Garnish with herb sprigs or edible flowers
- Serve on warmed plates for optimal temperature retention
Seasonal Variations Throughout the Year
Spring Omelettes
During spring months, I incorporate:
- Fresh peas (blanched briefly)
- Asparagus tips (sautéed until tender)
- Spring onions (finely chopped)
- Fresh mint or dill
Summer Variations
Summer calls for lighter additions:
- Cherry tomatoes (seeds removed, diced small)
- Fresh basil leaves (chiffonade)
- Zucchini (grated and moisture removed)
- Bell peppers (roasted and diced)
Fall and Winter Options
Heartier cold-weather versions might include:
- Mushrooms (wild varieties when available)
- Roasted root vegetables (finely diced)
- Aged cheeses (in small amounts)
- Fresh thyme or sage
Questions and Answers
Q: Why does my French omelette always turn out rubbery?
The most common cause is cooking over heat that’s too high. French omelettes require very gentle, low heat – much lower than you might think. The eggs should never sizzle or bubble aggressively. I recommend starting with your burner on the lowest possible setting and increasing very gradually if needed.
Q: How can I tell when my omelette is done?
The omelette is ready when it has a creamy, custard-like consistency but still jiggles slightly when you shake the pan. It should hold its shape when you draw your spatula through it but still appear slightly wet on top. This usually takes 3-4 minutes of constant stirring over very low heat.
Q: Can I make French omelettes ahead of time for a crowd?
French omelettes are really best made individually and served immediately. However, if you must prepare them in advance, you can make them slightly underdone, keep them warm in a low oven (200°F), and finish cooking just before serving. The texture won’t be quite as perfect, but it’s workable for entertaining.
Q: What’s the best pan size for French omelettes?
An 8-inch non-stick pan is ideal for a 2-3 egg omelette. This size allows proper heat distribution and gives you the right proportions for folding. Larger pans make it difficult to maintain even heat, while smaller pans can cause the omelette to be too thick.
Q: Why do my eggs stick to the pan even with butter?
This usually happens when the pan is too hot when you add the butter, causing it to brown and lose its non-stick properties. Make sure your pan is warm but not hot, add the butter, let it melt completely without browning, then add your eggs. Also, ensure your non-stick surface is in good condition.
Q: How many eggs should I use per omelette?
I recommend 2-3 eggs per omelette depending on appetite. Two eggs create a more delicate omelette, while three eggs provide a more substantial serving. More than three eggs becomes difficult to handle properly in a standard 8-inch pan.
Q: Can I use milk or cream in French omelettes?
Traditional French omelettes don’t include dairy beyond butter. Adding milk or cream can make the eggs more likely to curdle and can dilute the pure egg flavor that’s characteristic of this dish. The creaminess should come from proper technique, not added dairy.
Q: What herbs work best in French omelettes?
The classic combination is “fines herbes”: chives, parsley, tarragon, and chervil. However, chives alone work beautifully, as does fresh dill, basil, or thyme. The key is using them sparingly – about 1 teaspoon total per omelette – and chopping them very finely.
Q: How do I prevent my omelette from breaking when folding?
The eggs need to be cooked to just the right consistency – set enough to hold together but still creamy. If they’re too liquid, let them cook 15-20 seconds longer. If they’re overcooked and breaking, reduce your heat next time and stir more consistently. Practice makes perfect with the folding motion.
Q: Is it normal for French omelettes to be pale in color?
Yes! A proper French omelette should be very pale golden with no brown spots whatsoever. The pale color indicates gentle cooking and proper technique. Any browning suggests the heat was too high or the cooking time too long.
The French omelette represents everything I love about cooking – it’s simple in concept yet requires skill to execute properly. It teaches patience, technique, and the importance of quality ingredients. Each time I make one, I’m reminded that some of the most satisfying dishes come not from complex recipes or exotic ingredients, but from mastering fundamental techniques.
Whether you’re making a simple omelette nature for a quiet breakfast or an herb-filled version for weekend brunch, remember that practice truly does make perfect. Don’t be discouraged if your first attempts aren’t restaurant-perfect. Even professional chefs will tell you that the French omelette humbled them in their early careers.
The key is to approach it with patience, keep your heat low, and embrace the meditative quality of the constant stirring. Before long, you’ll find yourself creating silky, elegant omelettes that would make any French chef proud. Most importantly, you’ll have mastered a technique that will serve you well throughout your culinary journey, proving that sometimes the simplest dishes are the most rewarding to perfect.