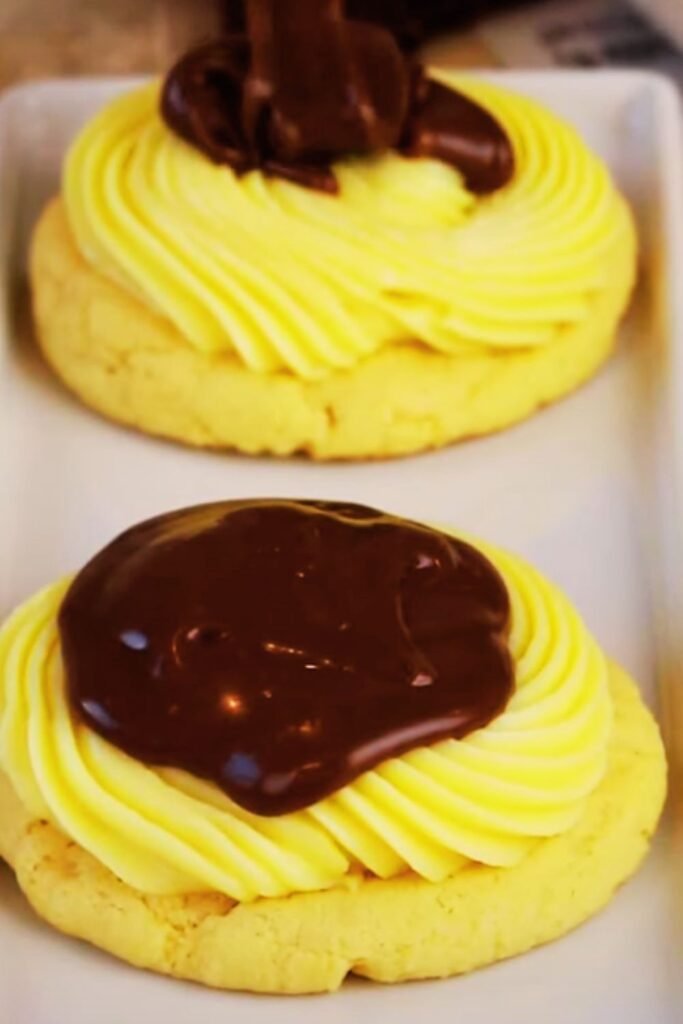
When I first discovered Boston Cream Pie Cookie Bites, I knew I had stumbled upon something extraordinary. These miniature masterpieces capture all the beloved flavors of the classic Boston cream pie in a perfectly portable, bite-sized format that’s absolutely irresistible. The combination of tender vanilla cookies, rich pastry cream filling, and glossy chocolate glaze creates a symphony of textures and flavors that will have your guests asking for the recipe.
What makes these cookie bites so special is their versatility and convenience. Unlike traditional Boston cream pie, which requires careful slicing and serving, these individual treats are perfect for parties, potlucks, or when you want to satisfy your sweet tooth without committing to an entire cake. I’ve been making variations of this recipe for years, and every time I serve them, they disappear faster than I can replenish the plate.
Understanding Boston Cream Pie Cookie Bites
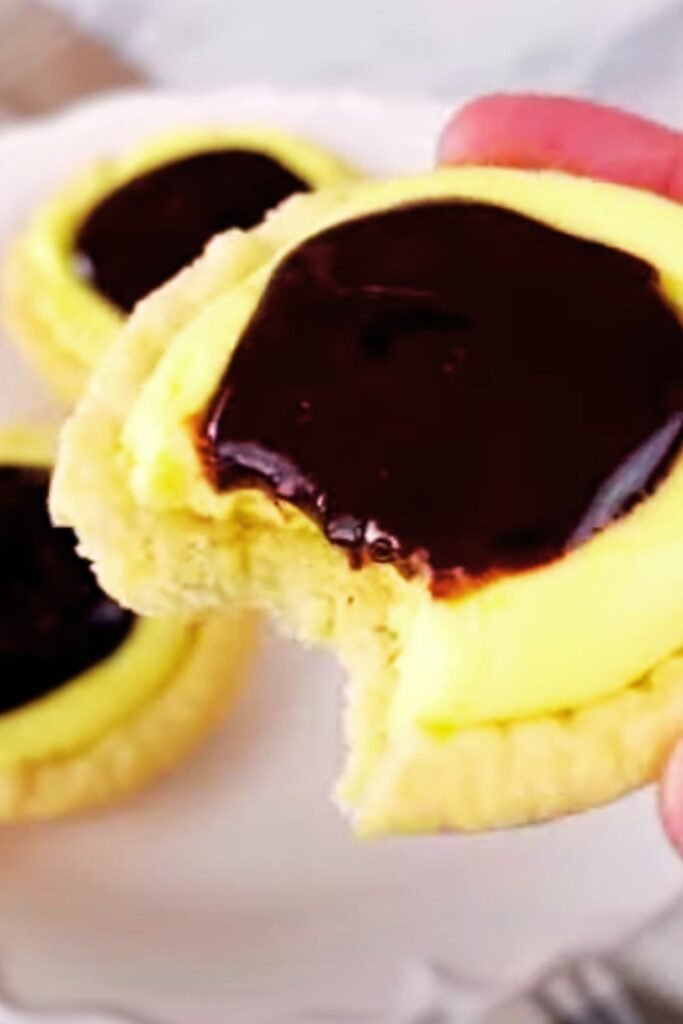
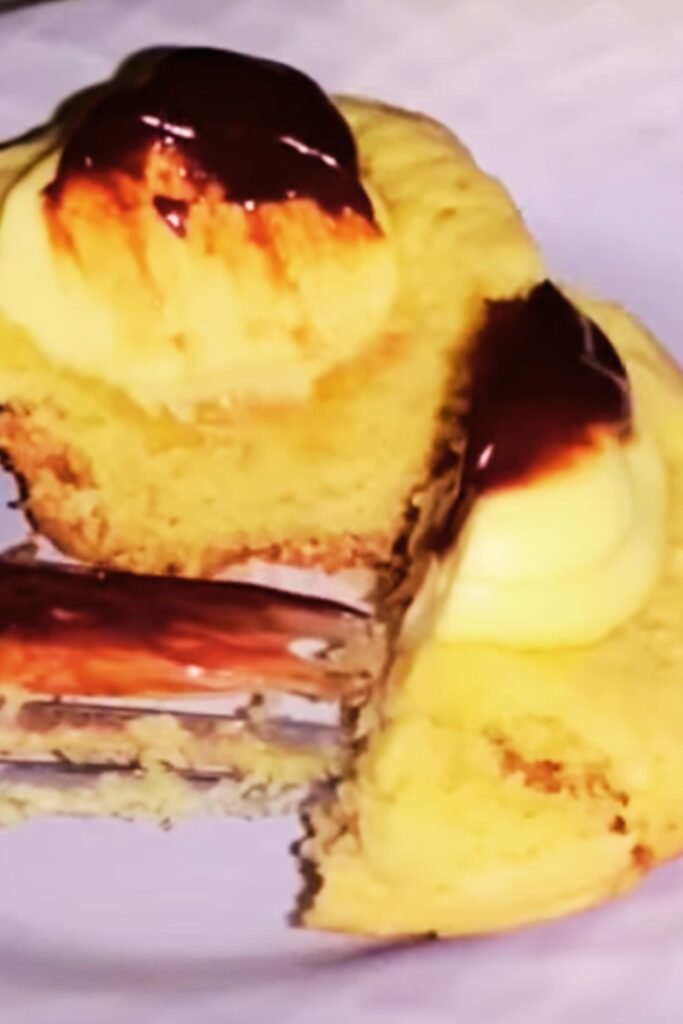
Boston Cream Pie Cookie Bites: Miniature sandwich cookies that replicate the classic Boston cream pie experience through three distinct components – a vanilla cookie base, pastry cream filling, and chocolate glaze topping.
Pastry Cream: A rich, vanilla-flavored custard made with eggs, milk, sugar, and cornstarch that serves as the signature filling, providing the creamy texture that defines these treats.
Cookie Base: A tender, slightly sweet vanilla cookie that provides structural support while complementing the cream filling without overwhelming the delicate flavors.
Chocolate Glaze: A smooth, glossy coating made from chocolate and cream that adds the final touch, creating both visual appeal and a perfect balance to the sweet cream filling.
The beauty of these cookie bites lies in their three-layer construction. Each component serves a specific purpose, and when combined, they create a harmonious dessert that’s both familiar and exciting. I’ve experimented with countless variations over the years, and I can confidently say that getting the balance right between these three elements is what separates good cookie bites from absolutely phenomenal ones.
Essential Ingredients and Their Roles
Creating perfect Boston Cream Pie Cookie Bites requires understanding how each ingredient contributes to the final product. I’ve learned through trial and error that quality ingredients make a significant difference in both taste and texture.
| Ingredient Category | Specific Ingredient | Quantity | Purpose | Pro Tips |
|---|---|---|---|---|
| Cookie Base | All-purpose flour | 2 cups | Structure and texture | Sift for lighter cookies |
| Butter (unsalted) | ½ cup | Richness and tenderness | Room temperature is crucial | |
| Granulated sugar | ⅓ cup | Sweetness and structure | Don’t overmix after adding | |
| Egg | 1 large | Binding and moisture | Room temperature mixes better | |
| Vanilla extract | 1 teaspoon | Flavor foundation | Use pure vanilla for best results | |
| Baking powder | 1 teaspoon | Leavening agent | Check expiration date | |
| Salt | ¼ teaspoon | Flavor enhancement | Balances sweetness | |
| Pastry Cream | Whole milk | 1 cup | Cream base | Heat gently to prevent scorching |
| Egg yolks | 3 large | Thickening and richness | Temper carefully | |
| Granulated sugar | ¼ cup | Sweetness | Dissolve completely | |
| Cornstarch | 2 tablespoons | Thickening agent | Whisk well to prevent lumps | |
| Vanilla extract | 1 teaspoon | Primary flavor | Add after cooking | |
| Butter | 2 tablespoons | Richness and gloss | Stir in while warm | |
| Chocolate Glaze | Dark chocolate | 4 oz | Base flavor | Choose quality chocolate |
| Heavy cream | ¼ cup | Smoothness | Room temperature works best | |
| Corn syrup | 1 tablespoon | Glossy finish | Creates professional appearance |
When I first started making these cookie bites, I underestimated the importance of ingredient quality. Using premium vanilla extract, real butter instead of margarine, and high-quality chocolate transforms these treats from good to absolutely exceptional. The difference is noticeable in both flavor depth and overall texture.
Step-by-Step Cookie Base Preparation
The foundation of exceptional Boston Cream Pie Cookie Bites begins with perfectly executed cookie bases. I’ve refined this process over countless batches, and I can share the techniques that consistently produce tender, flavorful cookies that hold up beautifully to the cream filling and chocolate glaze.
Mixing the Cookie Dough
I start by creaming the butter and sugar together until the mixture becomes light and fluffy, which typically takes about 3-4 minutes with an electric mixer. This step is crucial because it incorporates air into the dough, creating the tender texture we want. Many home bakers rush this step, but I’ve learned that patience here pays dividends in the final product.
Next, I add the egg and vanilla extract, mixing until just combined. The key is not to overmix at this stage, as it can develop the gluten too much and result in tough cookies. I then gradually add the dry ingredients, which I’ve previously whisked together in a separate bowl. This ensures even distribution of the baking powder and salt throughout the flour.
Shaping and Baking Techniques
The dough should be soft but manageable. If it’s too sticky, I chill it for 30 minutes, which makes it much easier to work with. I roll the dough into small balls, about 1 tablespoon each, and place them on parchment-lined baking sheets with adequate spacing. These cookies will spread slightly during baking, so I leave about 2 inches between each one.
Before baking, I gently flatten each ball with the bottom of a glass or my fingertips, creating a slight indentation that will hold the pastry cream beautifully. This technique also ensures even baking and prevents the cookies from becoming too puffy.
I bake the cookies at 350°F for 10-12 minutes, watching carefully for the edges to set but not brown. The centers should still look slightly underdone when I remove them from the oven, as they’ll continue cooking on the hot pan. After cooling on the baking sheet for 5 minutes, I transfer them to a wire rack to cool completely.
Mastering the Pastry Cream Filling
The pastry cream is where many home bakers feel intimidated, but I’ve developed a foolproof method that produces silky, perfectly thickened cream every time. The secret lies in temperature control and constant attention during the cooking process.
Tempering Technique
I begin by heating the milk in a heavy-bottomed saucepan over medium heat until it just begins to steam. Meanwhile, I whisk the egg yolks and sugar in a separate bowl until pale and smooth. The cornstarch gets whisked in thoroughly, ensuring no lumps remain.
The critical step is tempering the egg mixture. I gradually add about one-third of the hot milk to the egg mixture while whisking constantly. This prevents the eggs from scrambling and creates a smooth base. I then pour this mixture back into the saucepan with the remaining milk, whisking continuously.
Cooking to Perfection
Over medium heat, I cook the mixture while whisking constantly until it thickens to a pudding-like consistency. This usually takes 2-3 minutes once the mixture starts bubbling. I know it’s ready when it coats the back of a spoon and holds its shape when dropped from the whisk.
I immediately remove the pan from heat and whisk in the vanilla extract and butter. The butter adds richness and creates a glossy finish that makes the pastry cream irresistible. I then press plastic wrap directly onto the surface of the cream to prevent a skin from forming and refrigerate it for at least 2 hours.
Creating the Perfect Chocolate Glaze
The chocolate glaze serves as both the crowning glory and the binding element that transforms individual components into cohesive Boston Cream Pie Cookie Bites. My technique ensures a glossy, smooth finish that sets properly without becoming too thick or too runny.
Chocolate Selection and Preparation
I prefer using a combination of dark chocolate and a small amount of milk chocolate for the glaze. The dark chocolate provides depth and sophistication, while the milk chocolate adds smoothness and balances any bitterness. I chop the chocolate finely and place it in a heatproof bowl.
In a small saucepan, I heat the heavy cream until it just begins to simmer. I then pour the hot cream over the chopped chocolate and let it sit for 2 minutes without stirring. This allows the chocolate to melt gently and evenly.
Achieving the Perfect Consistency
After the resting period, I whisk the mixture from the center outward, creating a smooth, glossy ganache. If the mixture appears too thick, I add a tablespoon of warm cream. If it’s too thin, I let it cool for a few minutes while stirring occasionally.
The corn syrup addition is my secret weapon for achieving that professional bakery appearance. It creates an incredibly glossy finish that photographs beautifully and adds a subtle sweetness that complements the other flavors perfectly.
Assembly Techniques for Professional Results
Assembling Boston Cream Pie Cookie Bites requires patience and the right technique to achieve consistent, professional-looking results. I’ve developed a system that streamlines the process while maintaining quality across every bite.
Filling Application Method
I use a piping bag fitted with a round tip to apply the pastry cream, which gives me precise control over the amount and creates a neat, professional appearance. If you don’t have a piping bag, a small spoon works well, though it requires more patience to achieve uniform results.
I pipe about 1 teaspoon of pastry cream onto the flat side of half the cookies, creating a small mound that extends almost to the edges. The key is consistency – each cookie bite should have approximately the same amount of filling to ensure uniform appearance and taste.
Glazing Technique
For the chocolate glaze application, I use a small offset spatula or butter knife to spread the glaze evenly over the top of each assembled cookie bite. I work quickly but carefully, as the glaze sets relatively fast. The goal is complete coverage with a smooth, even finish.
I’ve found that slightly warming the glaze if it becomes too thick helps maintain workability. A few seconds in the microwave or a minute over a double boiler brings it back to the perfect consistency.
Troubleshooting Common Issues
Through years of making these cookie bites, I’ve encountered nearly every possible issue and developed solutions that consistently work. Understanding these common problems and their fixes will help you achieve perfect results every time.
| Problem | Likely Cause | Solution | Prevention |
|---|---|---|---|
| Cookies too hard | Overbaking or too much flour | Reduce baking time by 1-2 minutes | Use kitchen scale for accurate measurements |
| Pastry cream lumpy | Insufficient whisking or too high heat | Strain through fine mesh sieve | Whisk constantly during cooking |
| Pastry cream too thin | Undercooked or insufficient cornstarch | Return to heat and cook longer | Cook until thick enough to coat spoon |
| Glaze too thick | Chocolate too cool or insufficient cream | Warm gently and add cream gradually | Keep glaze slightly warm during use |
| Glaze won’t set | Too much cream or too warm environment | Refrigerate assembled bites | Allow glaze to cool before applying |
| Cookies spread too much | Butter too warm or dough too soft | Chill dough before baping | Use room temperature ingredients |
The most important lesson I’ve learned is that temperature control throughout the entire process is crucial. From properly creamed butter to correctly tempered pastry cream to perfectly warmed glaze, attention to temperature details makes the difference between good and exceptional results.
Storage and Serving Recommendations
Proper storage ensures your Boston Cream Pie Cookie Bites maintain their quality and appeal for maximum enjoyment. I’ve tested various storage methods and can share the techniques that preserve both flavor and texture optimally.
Short-term Storage
For consumption within 2-3 days, I store the assembled cookie bites in an airtight container in the refrigerator. I place parchment paper between layers to prevent sticking and maintain the integrity of the chocolate glaze. The cool temperature keeps the pastry cream fresh and the glaze stable.
Before serving refrigerated cookie bites, I let them sit at room temperature for 15-20 minutes. This allows the flavors to develop fully and the textures to reach their optimal state. Cold cookie bites, while safe to eat, don’t deliver the same flavor impact as those served at the proper temperature.
Long-term Storage Options
I’ve successfully frozen these cookie bites for up to one month with excellent results. I place them in a single layer on a baking sheet and freeze until solid, then transfer to airtight containers with parchment paper between layers. This method prevents freezer burn and maintains quality.
When ready to serve frozen cookie bites, I thaw them in the refrigerator overnight, then bring them to room temperature before serving. The texture and flavor remain remarkably close to freshly made bites when properly thawed.
Serving Suggestions
These cookie bites shine in various serving contexts. For elegant presentations, I arrange them on a tiered serving stand or decorative platter with fresh berries as garnish. The contrast between the rich cookie bites and bright fruit creates visual appeal and provides a refreshing palate cleanser.
For casual gatherings, I serve them alongside coffee or hot chocolate, as the warm beverages complement the cool pastry cream beautifully. I’ve also found they pair wonderfully with vanilla ice cream for an indulgent dessert experience that guests remember long after the event.
Nutritional Information and Modifications
Understanding the nutritional profile of Boston Cream Pie Cookie Bites helps in planning balanced menus and accommodating dietary needs. I’ve also developed several modifications that maintain flavor while addressing common dietary restrictions.
| Nutritional Component | Per Cookie Bite | Daily Value % | Notes |
|---|---|---|---|
| Calories | 145 | 7% | Based on 2000 calorie diet |
| Total Fat | 6g | 9% | Primarily from butter and chocolate |
| Saturated Fat | 4g | 20% | From dairy ingredients |
| Cholesterol | 35mg | 12% | From eggs and butter |
| Sodium | 65mg | 3% | Minimal sodium content |
| Total Carbohydrates | 22g | 8% | From flour and sugars |
| Dietary Fiber | 1g | 4% | Minimal fiber content |
| Sugars | 14g | – | Natural and added sugars |
| Protein | 3g | 6% | From eggs and milk |
Dietary Modifications
For gluten-free versions, I substitute the all-purpose flour with a high-quality gluten-free flour blend that includes xanthan gum. The texture remains remarkably similar to the original, though I sometimes add an extra tablespoon of flour blend if the dough seems too soft.
Dairy-free adaptations require more significant modifications. I use vegan butter for the cookies and coconut cream for both the pastry cream and chocolate glaze. The coconut cream creates a slightly different flavor profile that’s equally delicious, though distinctly different from the traditional version.
Advanced Variations and Flavor Profiles
After mastering the basic recipe, I began experimenting with variations that maintain the essential character of Boston Cream Pie Cookie Bites while introducing exciting new flavor dimensions. These adaptations have become favorites among my family and friends.
Flavor Variations
My chocolate cookie base variation substitutes 2 tablespoons of cocoa powder for an equal amount of flour, creating a rich chocolate cookie that pairs beautifully with vanilla pastry cream. The contrast between chocolate and vanilla creates a more complex flavor profile that appeals to serious chocolate lovers.
For citrus enthusiasts, I add the zest of one lemon to the pastry cream along with a tablespoon of fresh lemon juice. This creates a bright, tangy filling that cuts through the richness of the chocolate glaze beautifully. The citrus variation is particularly popular during spring and summer gatherings.
Coffee lovers appreciate my mocha variation, where I add 1 tablespoon of instant espresso powder to the chocolate glaze. The coffee flavor enhances the chocolate without overwhelming the other components, creating a sophisticated flavor profile that works wonderfully as an after-dinner treat.
Seasonal Adaptations
During autumn, I incorporate warm spices like cinnamon, nutmeg, and a hint of cardamom into the cookie base. These spices complement the vanilla pastry cream while adding seasonal warmth that makes the cookie bites perfect for fall gatherings.
Holiday versions might include peppermint extract in the pastry cream with crushed peppermint candies sprinkled over the chocolate glaze. This creates a festive appearance and flavor that captures the spirit of the season while maintaining the essential Boston cream pie character.
Professional Presentation Tips
Creating visually stunning Boston Cream Pie Cookie Bites involves attention to details that elevate them from homemade treats to bakery-quality desserts. I’ve learned several techniques that consistently produce impressive results.
Plating and Garnishing
I arrange the cookie bites on serving platters with careful attention to spacing and height variation. Using different levels creates visual interest and makes the display more engaging. Small dollops of whipped cream, fresh berries, or mint leaves add color contrast and suggest freshness.
For special occasions, I dust the serving area lightly with powdered sugar or cocoa powder, creating an elegant backdrop that highlights the glossy chocolate glaze. This simple technique adds professional polish without requiring special equipment or skills.
Photography and Documentation
When photographing these cookie bites for sharing or documentation, I position them near natural light sources and use simple, uncluttered backgrounds. The contrast between the dark chocolate glaze and light-colored surfaces creates striking visual impact that showcases the treats effectively.
I’ve found that photographing the assembly process creates engaging content that shows the care and craftsmanship involved in creating these special treats. Behind-the-scenes images of the pastry cream preparation or glaze application help tell the complete story of the recipe.
Q&A Section
Q: How far in advance can I make Boston Cream Pie Cookie Bites? I recommend making the individual components up to two days ahead, but assembling them no more than 24 hours before serving. The cookies can be stored in airtight containers at room temperature, while the pastry cream should be refrigerated. The chocolate glaze can be prepared and rewarmed when ready to use.
Q: Can I freeze the assembled cookie bites? Yes, these freeze exceptionally well for up to one month. I freeze them in a single layer first, then transfer to airtight containers with parchment paper between layers. Thaw in the refrigerator overnight before bringing to room temperature for serving.
Q: What’s the best way to prevent the pastry cream from becoming lumpy? Constant whisking during the cooking process is essential. I also recommend straining the finished pastry cream through a fine-mesh sieve to remove any small lumps that might have formed. Tempering the eggs properly also helps prevent lumping.
Q: Why does my chocolate glaze look dull instead of glossy? A dull glaze usually results from the chocolate being too cool when applied or from overworking the mixture. The corn syrup addition helps create gloss, and applying the glaze while it’s still slightly warm produces the best shine.
Q: Can I make these without eggs for allergy concerns? The cookies can be made egg-free using commercial egg replacer or flax eggs, though the texture will be slightly different. The pastry cream requires eggs for proper thickening, so I recommend using a pudding mix as a substitute for egg-allergic individuals.
Q: How do I know when the pastry cream is thick enough? The pastry cream should coat the back of a spoon and hold its shape when dropped from a whisk. It should be thick enough to pipe but not so thick that it’s difficult to work with. If it becomes too thick, I thin it with a tablespoon of milk.
Q: What chocolate works best for the glaze? I prefer a combination of dark chocolate (60-70% cacao) with a small amount of milk chocolate for balance. Avoid chocolate chips as they contain stabilizers that can affect the glaze texture. Bar chocolate chopped finely works best.
Q: Can I use store-bought pudding instead of making pastry cream? While homemade pastry cream provides superior flavor and texture, you can use thick vanilla pudding as a time-saving alternative. Choose a high-quality brand and consider adding extra vanilla extract to enhance the flavor.
Q: How do I prevent the cookies from spreading too much during baking? Ensure your butter is at proper room temperature (not melted or too soft) and consider chilling the dough if your kitchen is warm. Also, don’t overmix the dough once you add the flour, as this can cause excessive spreading.
Q: What’s the secret to getting the glaze perfectly smooth? Chop the chocolate very finely and let it sit with the hot cream for 2 minutes before stirring. Whisk from the center outward to create a smooth emulsion. If lumps persist, strain the glaze through a fine-mesh sieve.
Boston Cream Pie Cookie Bites represent the perfect marriage of convenience and indulgence, bringing the beloved flavors of a classic dessert into a modern, shareable format. Through careful attention to technique and quality ingredients, these treats consistently deliver the satisfaction of traditional Boston cream pie in an elegant, bite-sized package that never fails to impress. Whether you’re preparing them for a special celebration or simply treating yourself to something extraordinary, these cookie bites will quickly become a treasured addition to your dessert repertoire.