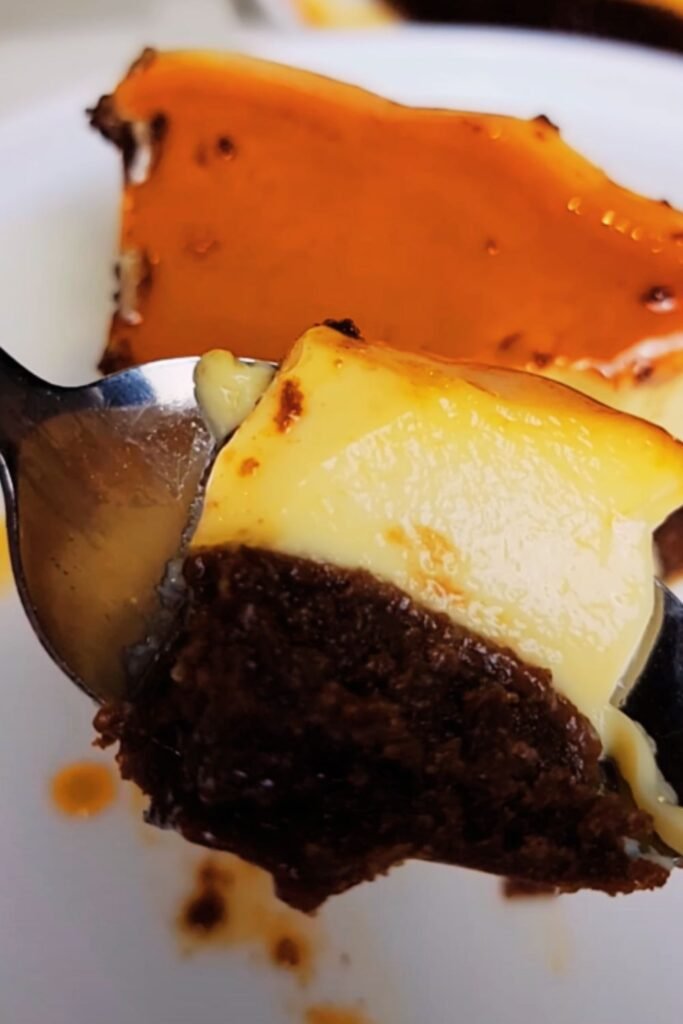
When I first encountered chocoflan at a Mexican restaurant years ago, I was absolutely mesmerized. This wasn’t just another dessert—it was culinary magic happening right before my eyes. The way the chocolate cake settled at the bottom while the silky flan floated on top seemed impossible, yet there it was, defying gravity and expectations in the most delicious way possible.
Chocoflan, affectionately known as “impossible cake” or “pastel imposible,” represents one of Mexico’s most ingenious dessert innovations. I’ve spent countless hours perfecting this recipe, and I’m thrilled to share everything I’ve learned about creating this show-stopping dessert that never fails to impress guests.
Understanding the Magic Behind Chocoflan
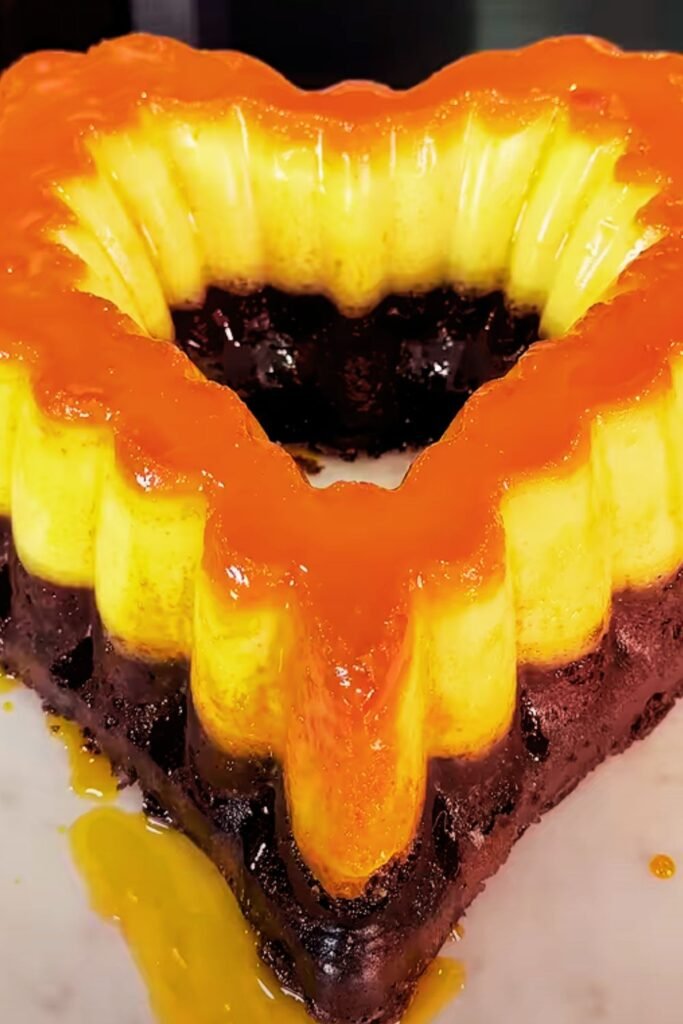
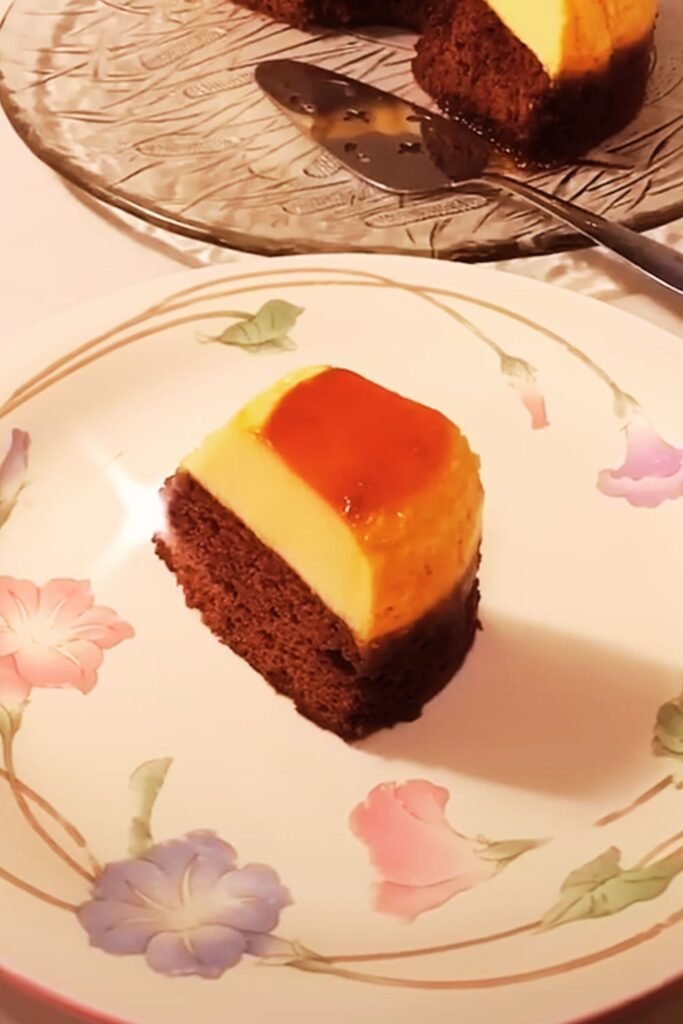
Chocoflan – A layered Mexican dessert consisting of chocolate cake batter and flan custard that magically switch places during baking, creating a two-layer cake with caramel flan on top and moist chocolate cake on the bottom.
Impossible Cake – The English translation of “pastel imposible,” referring to the seemingly impossible way the layers flip during the baking process.
Cajeta – Traditional Mexican caramel sauce made from goat’s milk, though regular caramel can be substituted.
Bundt Pan Method – The traditional baking technique using a bundt or tube pan that allows for even heat distribution and proper layer separation.
The science behind this dessert fascinated me from the beginning. During baking, the denser chocolate cake batter sinks while the lighter flan mixture rises, creating this magical flip that transforms your dessert into something truly spectacular. I remember the first time I successfully made chocoflan—I felt like I had discovered some secret culinary alchemy.
Essential Ingredients for Perfect Chocoflan
Creating exceptional chocoflan requires attention to ingredient quality and proportions. Through my extensive testing, I’ve discovered that certain ingredients make all the difference in achieving that perfect texture and flavor balance.
| Ingredient Category | Specific Item | Quantity | Quality Notes | Purpose |
|---|---|---|---|---|
| Caramel Base | Granulated sugar | 1 cup | Fine crystals preferred | Creates golden caramel layer |
| Water | 1/4 cup | Filtered recommended | Dissolves sugar evenly | |
| Flan Layer | Sweetened condensed milk | 1 can (14 oz) | Full-fat variety | Provides richness and sweetness |
| Evaporated milk | 1 can (12 oz) | Whole milk version | Creates smooth custard texture | |
| Large eggs | 3 whole | Room temperature | Binding agent for custard | |
| Vanilla extract | 1 tsp | Pure vanilla preferred | Enhances flavor profile | |
| Cake Layer | All-purpose flour | 1 cup | Unbleached preferred | Structure foundation |
| Cocoa powder | 1/3 cup | Dutch-processed | Rich chocolate flavor | |
| Granulated sugar | 3/4 cup | Standard white sugar | Sweetness and moisture | |
| Baking powder | 1 tsp | Fresh (check expiration) | Leavening agent | |
| Salt | 1/2 tsp | Fine sea salt | Flavor enhancement | |
| Vegetable oil | 1/3 cup | Neutral flavor | Moisture retention | |
| Large egg | 1 whole | Room temperature | Binding and structure | |
| Whole milk | 1/2 cup | Full-fat preferred | Liquid component |
My experience has taught me that ingredient temperature matters significantly. I always bring eggs and milk to room temperature before starting, as this ensures better mixing and a smoother final texture. Cold ingredients can cause the batter to seize or create lumps in your flan mixture.
Step-by-Step Chocoflan Preparation
Preparing Your Workspace and Equipment
Before diving into the actual cooking process, I always emphasize the importance of proper preparation. This dessert requires timing and organization, so having everything ready makes the difference between success and frustration.
I use a 10-cup bundt pan for this recipe, though a tube pan works equally well. The key is ensuring your pan has a central tube that allows for even heat distribution. I’ve tried making chocoflan in regular cake pans, but the results never match the perfection achieved with the proper equipment.
Creating the Caramel Foundation
The caramel layer forms the stunning golden top of your finished chocoflan. I’ve learned through trial and error that patience is absolutely crucial during this step. Rushing the caramel process leads to crystallization or burnt flavors that can ruin the entire dessert.
- Combine sugar and water in a heavy-bottomed saucepan over medium heat
- Stir gently until sugar completely dissolves
- Stop stirring once mixture begins bubbling
- Watch carefully as color changes from clear to amber
- Swirl pan occasionally to ensure even browning
- Remove from heat when deep amber color is achieved
- Pour immediately into bundt pan, tilting to coat bottom evenly
The caramel continues cooking from residual heat, so I remove it just before reaching my desired color. This prevents the bitter taste that comes from overcooking.
Preparing the Silky Flan Layer
Creating the perfect flan consistency requires gentle mixing to avoid incorporating too much air, which can create bubbles in your final product. I’ve found that straining the mixture eliminates any lumps and ensures that silky-smooth texture we’re after.
My technique involves whisking the condensed milk and evaporated milk first, then gradually incorporating the eggs and vanilla. This method prevents the eggs from scrambling and creates a homogeneous mixture that bakes evenly.
Crafting the Chocolate Cake Component
The chocolate cake layer needs to be rich enough to complement the flan but not so dense that it overwhelms the delicate custard. I’ve adjusted this recipe countless times to achieve the perfect balance of moisture and chocolate intensity.
| Mixing Stage | Action | Duration | Critical Points |
|---|---|---|---|
| Dry Ingredients | Whisk flour, cocoa, sugar, baking powder, salt | 1 minute | Ensure no lumps remain |
| Wet Ingredients | Combine oil, egg, milk, vanilla | 30 seconds | Mix just until combined |
| Final Batter | Fold wet into dry ingredients | 1-2 minutes | Avoid overmixing |
| Consistency Check | Smooth, pourable batter | Visual | Should coat spoon lightly |
The Assembly Magic
This is where the magic happens, and honestly, it still amazes me every time. The assembly order is crucial—flan mixture goes in first, followed by the cake batter. During baking, these layers will switch positions, creating the impossible effect that gives this dessert its name.
I pour the flan mixture gently over the caramel, using a large spoon to break the fall and prevent disturbing the caramel layer. Then, I add the chocolate cake batter in the same manner, spreading it evenly but carefully.
Baking Techniques and Temperature Control
Water Bath Method
The water bath, or “baño maría,” is absolutely essential for achieving the perfect chocoflan texture. I’ve tried baking without it, and the results were disappointing—the custard layer became rubbery, and the cake dried out.
My water bath setup involves placing the filled bundt pan inside a larger roasting pan, then adding hot water until it reaches halfway up the sides of the bundt pan. This gentle, moist heat environment allows both layers to cook properly without overcooking.
Temperature and Timing Guidelines
| Baking Phase | Temperature | Duration | Visual Cues |
|---|---|---|---|
| Initial Bake | 350°F (175°C) | 50-60 minutes | Center almost set |
| Doneness Test | Same temperature | 5-10 minutes more | Toothpick comes out clean |
| Cooling Phase | Room temperature | 1 hour | Pan cool to touch |
| Refrigeration | 40°F (4°C) | Minimum 4 hours | Complete setting |
I always test doneness by inserting a toothpick into the center—it should come out with just a few moist crumbs. The flan layer will still jiggle slightly, which is exactly what we want.
Unmolding and Presentation Secrets
The Critical Unmolding Process
Unmolding chocoflan successfully requires confidence and the right technique. I’ve had disasters early in my chocoflan journey, but I’ve learned that preparation and timing make all the difference.
Before unmolding, I run a thin knife around the edges to loosen any stuck portions. Then, I place the serving plate upside down over the bundt pan and flip everything quickly but smoothly. The key is committing to the flip—hesitation often leads to accidents.
Serving and Garnish Ideas
The presentation of chocoflan can be as simple or elaborate as you desire. I prefer letting the dessert speak for itself, but a few thoughtful garnishes can elevate the visual appeal significantly.
Simple Elegant Presentations:
- Fresh berries arranged around the base
- Light dusting of powdered sugar
- Mint leaves for color contrast
- Chopped toasted almonds or pecans
Special Occasion Presentations:
- Edible flowers for formal dinners
- Chocolate shavings cascading down sides
- Caramel drizzle patterns on the plate
- Fresh whipped cream rosettes
Nutritional Information and Dietary Considerations
Understanding the nutritional content of chocoflan helps with portion planning and dietary accommodations. While this dessert is definitely an indulgence, I believe that knowing what you’re consuming allows for better overall dietary balance.
| Nutritional Component | Per Serving (1/12 of recipe) | Daily Value % | Notes |
|---|---|---|---|
| Calories | 385 | 19% | High due to dairy and sugar content |
| Total Fat | 12g | 18% | Primarily from eggs and oil |
| Saturated Fat | 6g | 30% | From condensed and evaporated milk |
| Cholesterol | 95mg | 32% | From eggs and dairy |
| Sodium | 180mg | 8% | Moderate level |
| Total Carbohydrates | 65g | 22% | Mainly from sugars |
| Dietary Fiber | 2g | 8% | From cocoa and flour |
| Sugars | 58g | – | Natural and added sugars |
| Protein | 8g | 16% | From eggs and dairy |
Dietary Modification Options
I’ve experimented with various modifications to accommodate different dietary needs, though I must admit that some substitutions work better than others.
Lactose-Free Adaptations:
- Use lactose-free condensed and evaporated milk
- Substitute regular milk with lactose-free variety
- Results are nearly identical to original
Reduced Sugar Versions:
- Replace half the sugar with stevia or erythritol
- Texture changes slightly but remains acceptable
- Taste requires adjustment period
Gluten-Free Modifications:
- Use gluten-free flour blend (cup-for-cup replacement)
- Add xanthan gum if not included in blend
- Texture becomes slightly denser but still delicious
Troubleshooting Common Chocoflan Challenges
Layer Separation Issues
One of the most frequent problems I encounter from readers is incomplete layer separation. When the layers don’t flip properly, you end up with a muddled mess instead of distinct layers.
Common Causes and Solutions:
Batter Too Thick: If your chocolate cake batter is too thick, it won’t sink properly. I always check that my batter pours easily and adjusts liquid content if necessary.
Oven Temperature Fluctuations: Inconsistent oven temperature can prevent proper layer formation. I recommend using an oven thermometer to verify accuracy.
Insufficient Baking Time: Underbaking prevents complete layer separation. The center should be almost set before removing from oven.
Caramel Crystallization Problems
Crystallized caramel creates an unpleasant texture and appearance. I’ve learned to prevent this through careful technique and timing.
Prevention Strategies:
- Never stir caramel once it begins bubbling
- Use clean utensils and pans
- Add water gradually if mixture seems too thick
- Work quickly once desired color is achieved
Texture and Consistency Issues
| Problem | Likely Cause | My Solution | Prevention |
|---|---|---|---|
| Rubbery flan | Overbaking or too high temperature | Lower temperature, shorter time | Use water bath consistently |
| Dry cake layer | Insufficient moisture or overbaking | Add extra tablespoon of milk | Monitor baking time carefully |
| Lumpy texture | Inadequate mixing or temperature differences | Strain mixtures, room temperature ingredients | Proper preparation sequence |
| Cracked surface | Rapid temperature changes | Gradual cooling process | Consistent environment |
Advanced Variations and Flavor Combinations
International Inspired Variations
My exploration of chocoflan variations has led me to some incredible flavor combinations that honor the traditional technique while introducing exciting new tastes.
Italian Tiramisu Chocoflan:
- Add espresso to chocolate cake layer
- Include mascarpone in flan mixture
- Dust with cocoa powder before serving
French Chocolate Orange Chocoflan:
- Orange zest in both layers
- Grand Marnier in flan mixture
- Candied orange garnish
American Peanut Butter Chocoflan:
- Peanut butter in cake batter
- Chopped peanuts in caramel
- Peanut butter drizzle decoration
Seasonal Adaptations
I love adapting chocoflan for different seasons and holidays. These variations keep the dessert fresh and exciting throughout the year.
Spring Version:
- Lemon zest in flan layer
- Fresh berry compote
- Lighter, more delicate presentation
Summer Tropical:
- Coconut milk in flan
- Mango caramel
- Toasted coconut garnish
Fall Spiced:
- Cinnamon and nutmeg in cake
- Apple caramel
- Candied pecans
Winter Holiday:
- Peppermint extract
- Chocolate ganache drizzle
- Crushed candy cane garnish
Storage and Make-Ahead Strategies
Optimal Storage Conditions
Proper storage ensures that your chocoflan maintains its perfect texture and flavor for several days. I’ve tested various storage methods and found that the right approach makes a significant difference in quality retention.
Refrigerator Storage:
- Cover tightly with plastic wrap
- Store for up to 5 days
- Bring to cool room temperature before serving
Freezer Storage:
- Wrap individual slices in plastic wrap
- Store in freezer-safe containers
- Thaw gradually in refrigerator
- Best consumed within 1 month
Make-Ahead Timeline
| Preparation Stage | Timeline | Storage Method | Quality Notes |
|---|---|---|---|
| Complete dessert | 3 days ahead | Refrigerated, covered | Peak quality at 24-48 hours |
| Caramel only | 1 week ahead | Room temperature, sealed | Reheat gently before use |
| Flan mixture | 1 day ahead | Refrigerated, covered | Whisk before using |
| Cake batter | Same day only | Not recommended | Quality deteriorates quickly |
I often make chocoflan two days before serving for optimal flavor development. The layers continue to meld and improve, creating an even more cohesive and delicious dessert.
Serving Suggestions and Pairings
Beverage Pairings
The rich, sweet nature of chocoflan pairs beautifully with various beverages that can balance or complement its intensity. Through years of serving this dessert, I’ve discovered some exceptional combinations.
Hot Beverage Pairings:
- Strong black coffee or espresso
- Mexican hot chocolate with cinnamon
- Chai tea with warming spices
- Earl Grey tea for citrus contrast
Cold Beverage Pairings:
- Cold brew coffee with cream
- Fresh fruit agua frescas
- Sparkling water with lime
- Iced tea with mint
Complementary Dessert Elements
Sometimes I serve chocoflan as part of a larger dessert spread, and certain accompaniments enhance the overall experience without overwhelming the main attraction.
Textural Contrasts:
- Crispy churros for dipping
- Toasted almonds or hazelnuts
- Fresh fruit with natural acidity
- Light cookies or wafers
Flavor Enhancements:
- Vanilla ice cream on the side
- Fresh whipped cream
- Fruit coulis or sauces
- Chocolate sauce drizzle
Questions and Answers
Q. Why didn’t my chocoflan layers flip properly during baking?
The most common reason for incomplete layer flipping is incorrect batter consistency. Your chocolate cake batter needs to be dense enough to sink below the flan mixture. I always ensure my cake batter is thick but pourable—if it’s too thin, add a tablespoon more flour; if too thick, add milk gradually. Also, make sure you’re using the water bath method, as the gentle, even heat is crucial for proper layer separation.
Q. Can I make chocoflan without a bundt pan?
While a bundt pan produces the best results, I’ve successfully made chocoflan in other pans. A tube pan works excellently, and I’ve even used a large soufflé dish in emergencies. The key is having sufficient depth and a shape that allows for even heat distribution. Avoid shallow pans as they prevent proper layer formation and can lead to overcooking.
Q. How do I know when my chocoflan is completely done?
I test doneness by inserting a toothpick into the center—it should come out with just a few moist crumbs attached. The flan layer will still have a slight jiggle, which is exactly what you want. If the toothpick comes out completely clean, you may have slightly overbaked it, but it will still be delicious. The total baking time is usually 50-60 minutes, but ovens vary.
Q. What’s the secret to preventing crystallized caramel?
Preventing caramel crystallization requires careful technique. Never stir the sugar mixture once it starts bubbling—only swirl the pan gently if needed. Use a clean, heavy-bottomed pan and make sure no sugar crystals remain on the sides. I sometimes brush the sides with a wet pastry brush to remove any crystals. Work quickly once the caramel reaches the right color, as it continues cooking from residual heat.
Q. Can I substitute ingredients to make chocoflan healthier?
I’ve experimented with various substitutions with mixed results. You can replace half the sugar with natural sweeteners like stevia, though the texture changes slightly. For lower fat content, I’ve used light condensed milk and reduced-fat evaporated milk successfully. Applesauce can replace some of the oil in the cake layer. However, dramatic changes often affect the magical layer-flipping property, so I recommend making minor modifications first.
Q. Why does my chocoflan crack on top during baking?
Cracking usually occurs from rapid temperature changes or overbaking. Make sure you’re using the water bath method, which provides gentle, consistent heat. Avoid opening the oven door frequently during baking, as temperature fluctuations can cause cracking. If your oven runs hot, reduce the temperature by 25 degrees. Also, ensure gradual cooling—let it cool in the turned-off oven with the door slightly open before moving to room temperature.
Q. How far in advance can I make chocoflan for a party?
Chocoflan actually improves with time, so I often make it 2-3 days ahead. The flavors meld beautifully, and the texture becomes even more perfect. Store it covered in the refrigerator and remove about 30 minutes before serving to take the chill off. I don’t recommend making it more than 5 days ahead, as the quality begins to decline after that point.
Q. What should I do if my chocoflan won’t come out of the pan?
Don’t panic! I’ve rescued many stuck chocoflan desserts. First, make sure you’ve run a knife around all edges, including the center tube. Place the pan in a larger dish with hot water for 2-3 minutes to warm the caramel slightly. If it still won’t release, use a hair dryer to warm the outside of the pan. As a last resort, you can serve it directly from the pan—it will still taste amazing.
Q. Can I freeze chocoflan for long-term storage?
Yes, but with some considerations. I wrap individual slices tightly in plastic wrap and store them in freezer containers for up to a month. The texture changes slightly after freezing—the flan becomes a bit denser—but it’s still delicious. Thaw slowly in the refrigerator overnight. I don’t recommend freezing the whole dessert as it becomes difficult to slice cleanly after thawing.
Q. What’s the difference between Mexican cajeta and regular caramel in this recipe?
Cajeta is traditional Mexican caramel made from goat’s milk, which gives it a more complex, slightly tangy flavor compared to regular caramel. I use regular granulated sugar caramel in my recipe because it’s more accessible, but you can certainly substitute store-bought cajeta if you find it. The cooking method remains the same—just warm the cajeta slightly to make it pourable before adding to your pan.
Creating perfect chocoflan has become one of my greatest culinary joys. This dessert represents everything I love about cooking—the combination of technique and creativity, the element of surprise, and the pure satisfaction of watching people’s faces light up when they taste something truly special. Whether you’re making it for a special occasion or just because you want to experience a little magic in your kitchen, chocoflan never fails to deliver that wow factor that makes cooking so rewarding.
Remember, like any worthwhile culinary endeavor, chocoflan may take a few attempts to perfect. I encourage you to embrace the process, learn from each attempt, and most importantly, enjoy every delicious bite along the way. The impossible truly becomes possible when you master this incredible Mexican dessert.