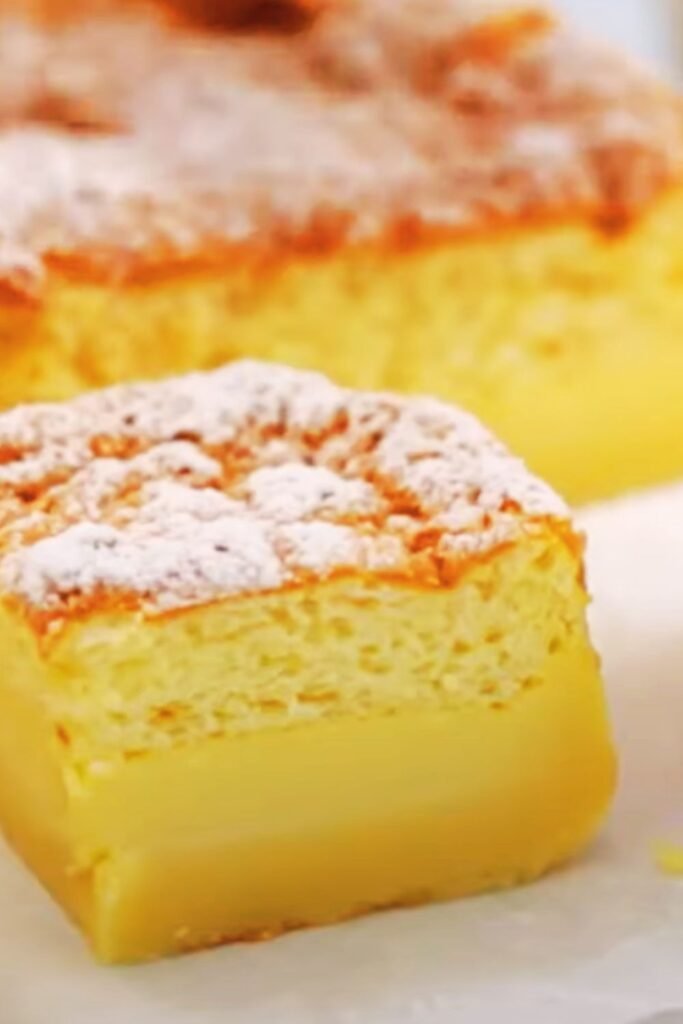
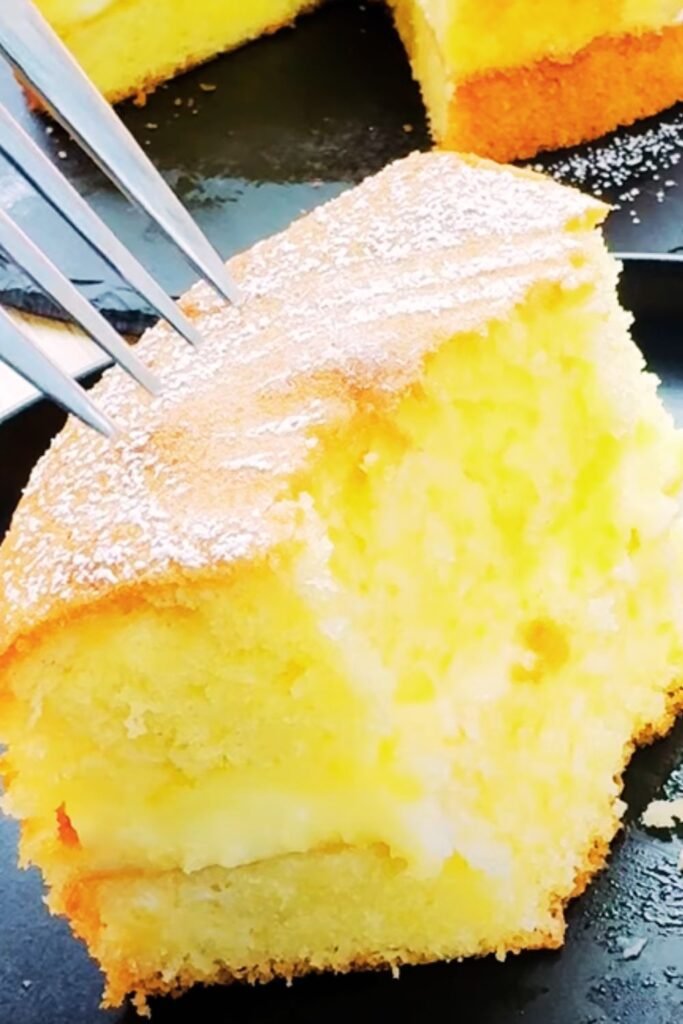
I still remember the first time I encountered a magic custard cake – I was absolutely bewildered by how one simple batter could magically separate into three distinct layers during baking. The bottom transforms into a dense custard base, the middle becomes a creamy custard filling, and the top creates a light, airy sponge cake. It seemed too good to be true, yet here I was, staring at this culinary marvel that had emerged from my own oven.
Today, I’m excited to share everything I’ve learned about creating the perfect Vanilla Magic Custard Cake. This isn’t just another dessert recipe – it’s a fascinating lesson in food science wrapped up in an absolutely delicious package that will leave your family and friends wondering how you managed to create such magic in your kitchen.
What Makes This Cake Truly “Magic”
The magic lies in the science behind the batter’s behavior during baking. When you pour what appears to be a simple, somewhat thin batter into your pan, the heat of the oven causes the different components to separate naturally based on their densities and cooking properties.
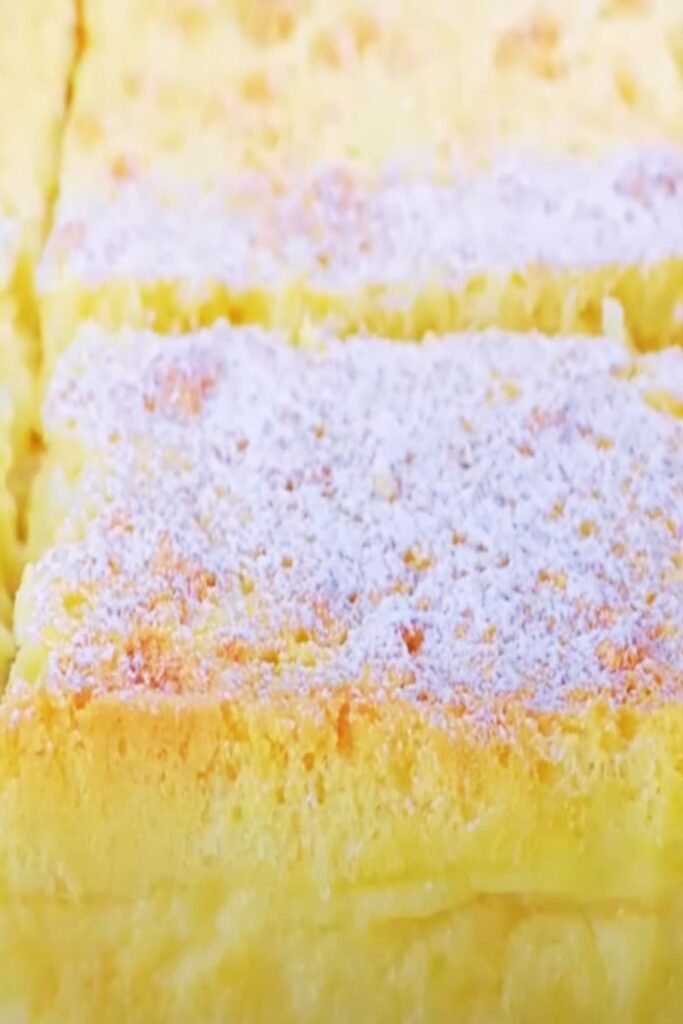
The Three Magical Layers:
- Top Layer (Sponge): Light, airy cake texture created by the whipped egg whites
- Middle Layer (Custard): Creamy, pudding-like consistency from the milk and egg yolks
- Bottom Layer (Dense Custard): Firm, almost flan-like base that provides structure
The key to achieving perfect layer separation lies in the temperature of your ingredients and the precise technique used when combining them. I’ve spent countless hours perfecting this method, and I can assure you that once you understand the science, you’ll be creating perfect magic custard cakes every time.
Essential Ingredients and Their Roles
Understanding each ingredient’s function will help you achieve consistent results and troubleshoot any issues that might arise.
Primary Ingredients:
- Eggs (4 large): The foundation of our magic – yolks provide richness and structure, whites create lift
- Granulated Sugar (¾ cup): Sweetens and helps stabilize the egg whites
- Unsalted Butter (4 tablespoons): Adds richness and helps create the custard layers
- Vanilla Extract (2 teaspoons): Provides that classic, comforting flavor profile
- All-Purpose Flour (¾ cup): Creates structure without making the cake too dense
- Whole Milk (2 cups): The liquid component that forms the custard layers
- Pinch of Salt: Enhances all other flavors
Quality Considerations: I always use room temperature eggs as they incorporate more easily and create better volume when whipped. The milk should be lukewarm – not hot enough to cook the eggs, but warm enough to help the ingredients blend smoothly. Fresh vanilla extract makes a noticeable difference in the final flavor, so I avoid imitation vanilla whenever possible.
Step-by-Step Magic Custard Cake Method
My foolproof method has been refined through years of baking experience and countless conversations with fellow baking enthusiasts. Each step builds upon the previous one, creating the perfect conditions for our magical transformation.
Preparation Phase:
- Preheat your oven to 325°F (163°C) – this moderate temperature is crucial for proper layer development
- Grease an 8×8 inch baking dish with butter and dust lightly with flour
- Separate your eggs while they’re cold, then let them come to room temperature (about 30 minutes)
Creating the Base:
- In a large mixing bowl, whisk the egg yolks with sugar until pale and creamy (approximately 3-4 minutes of vigorous whisking)
- Melt the butter and let it cool slightly before whisking it into the yolk mixture
- Add vanilla extract and salt, mixing until well combined
- Gradually add the flour, whisking constantly to prevent lumps from forming
The Critical Milk Addition: This step often intimidates bakers, but I’ve discovered the secret to success. Add the lukewarm milk very slowly while whisking continuously. The mixture will look quite thin and somewhat curdled – this is completely normal and expected. Don’t panic if it doesn’t look smooth; this texture is actually what we want for proper layer separation.
Incorporating the Egg Whites:
- In a spotlessly clean bowl, whip the egg whites to stiff peaks using an electric mixer
- Using a large spoon or spatula, gently fold one-third of the whites into the batter
- Add the remaining whites in two more additions, folding just until no white streaks remain
- The final batter should be quite liquid with some foam on top
Baking Process: Pour the batter into your prepared pan and bake for 50-60 minutes. The top should be golden brown and set, but still slightly jiggly in the center. A toothpick inserted into the center should come out with moist crumbs, not wet batter.
Temperature and Timing Guide
| Phase | Temperature | Duration | Visual Cues |
|---|---|---|---|
| Preheating | 325°F (163°C) | 15-20 minutes | Oven fully heated |
| Initial Baking | 325°F (163°C) | 30 minutes | Batter begins to set |
| Final Baking | 325°F (163°C) | 20-30 minutes | Golden top, slight jiggle |
| Cooling | Room Temperature | 2 hours minimum | Layers fully defined |
| Chilling | 35-40°F (2-4°C) | 4+ hours | Optimal serving texture |
Troubleshooting Common Issues
Through my years of making this cake, I’ve encountered nearly every possible challenge. Here are the most common issues and my proven solutions:
Problem: Layers Don’t Separate Properly
- Cause: Usually temperature-related – milk too hot or eggs too cold
- Solution: Ensure milk is lukewarm and eggs are at room temperature before starting
Problem: Top Layer Too Dense
- Cause: Over-mixing after adding egg whites or whites not whipped to proper peaks
- Solution: Fold whites gently and ensure they reach stiff peak stage before incorporating
Problem: Bottom Layer Too Thin
- Cause: Oven temperature too high or baking time too short
- Solution: Use an oven thermometer to verify temperature; extend baking time if needed
Problem: Custard Layers Too Sweet
- Cause: Sugar ratio imbalance
- Solution: Reduce sugar by 2 tablespoons and add an extra pinch of salt
Nutritional Information and Serving Details
Understanding the nutritional content helps with meal planning and portion control. This cake is rich and satisfying, so smaller portions are typically sufficient.
| Nutrient | Per Slice (1/9 of cake) | % Daily Value |
|---|---|---|
| Calories | 245 | 12% |
| Total Fat | 8.5g | 13% |
| Saturated Fat | 5.2g | 26% |
| Cholesterol | 125mg | 42% |
| Sodium | 95mg | 4% |
| Total Carbs | 36g | 13% |
| Dietary Fiber | 0.8g | 3% |
| Sugars | 32g | – |
| Protein | 8.2g | 16% |
| Calcium | 145mg | 14% |
| Iron | 1.1mg | 6% |
Serving Suggestions: I love serving this cake slightly chilled with a light dusting of powdered sugar. Fresh berries make an excellent accompaniment – the tartness beautifully balances the rich custard flavors. A dollop of lightly sweetened whipped cream adds an extra layer of indulgence without overwhelming the delicate vanilla notes.
For special occasions, I sometimes drizzle a simple berry coulis around the plate or add a few mint leaves for a pop of color. The cake’s elegant appearance makes it perfect for dinner parties, yet it’s simple enough for everyday family desserts.
Storage and Make-Ahead Tips
One of the wonderful aspects of this cake is how well it keeps and actually improves with time. The layers continue to develop and set even after baking, making it an excellent make-ahead dessert.
Short-Term Storage (1-3 days): Cover tightly with plastic wrap and refrigerate. The cake will maintain its texture and actually taste better on the second day as the flavors meld together.
Longer Storage (up to 1 week): Wrap individual slices in plastic wrap and store in an airtight container in the refrigerator. This method prevents the cake from absorbing other flavors and maintains moisture.
Freezing Instructions: While not ideal due to the custard layers, you can freeze this cake for up to 2 months. Wrap tightly in plastic wrap, then aluminum foil. Thaw completely in the refrigerator before serving. The texture may be slightly different, but it’s still delicious.
Variations and Flavor Adaptations
Once you’ve mastered the basic technique, experimenting with flavors becomes incredibly fun. I’ve developed several variations that maintain the magical three-layer structure while offering different taste experiences.
Lemon Magic Custard Cake: Replace vanilla extract with fresh lemon juice and add lemon zest to the egg yolk mixture. The citrus brightens the entire dessert and pairs beautifully with the creamy custard layers.
Chocolate Magic Custard Cake: Substitute 2 tablespoons of cocoa powder for 2 tablespoons of flour. Sift the cocoa with the flour to prevent lumps. The result is a rich, chocolate version that’s absolutely divine.
Coconut Magic Custard Cake: Replace half the milk with canned coconut milk and add shredded coconut to the batter. This creates a tropical twist that’s particularly popular during summer months.
Coffee Magic Custard Cake: Dissolve 2 tablespoons of instant coffee in the warm milk before adding it to the batter. This creates a sophisticated, adult version that pairs wonderfully with after-dinner coffee.
The Science Behind the Magic
Understanding the science makes you a better baker and helps you troubleshoot issues more effectively. The magic custard cake is essentially a demonstration of density stratification combined with protein coagulation at different temperatures.
Density Separation: The different components of our batter have varying densities. The whipped egg whites are the lightest and naturally rise to the top during baking. The milk and egg yolk mixture, being denser, settles toward the bottom. The flour helps create structure throughout but concentrates differently at various levels.
Temperature Effects: As the oven heat penetrates the batter, different proteins coagulate at different rates and temperatures. The egg whites set first, creating the sponge layer. The middle layer sets more slowly, maintaining its creamy texture. The bottom layer, being denser and closer to the heat source, sets into a firm custard.
Moisture Migration: During baking, moisture moves through the batter in predictable ways. Some evaporates from the top, helping create the cake-like texture. Some remains trapped in the middle layer, maintaining the custard consistency. Understanding this helps explain why proper oven temperature is so crucial.
Professional Tips from My Kitchen
After making hundreds of these cakes, I’ve developed techniques that consistently produce perfect results:
Equipment Matters: I always use a metal baking pan rather than glass or ceramic. Metal conducts heat more evenly, promoting better layer development. A 8×8 inch square pan gives the ideal depth for proper layer formation.
Timing is Everything: Don’t rush the cooling process. I let the cake cool at room temperature for at least 2 hours before refrigerating. This gradual temperature change helps the layers set properly without shocking the delicate custard structure.
Testing for Doneness: The cake is done when the top is golden brown and set, but the center still has a slight jiggle. Over-baking will result in a dense, less creamy middle layer.
Ingredient Temperature Control: I keep a kitchen thermometer handy to check milk temperature. It should be around 100-110°F (38-43°C) – warm to the touch but not hot enough to cook the eggs.
Seasonal Adaptations and Holiday Versions
I love adapting this cake for different seasons and holidays. The basic technique remains the same, but small additions can transform it into a festive centerpiece.
Spring Version: Add fresh strawberry puree to create pink-tinted layers, or incorporate lavender extract for a sophisticated floral note.
Summer Adaptation: Fold in fresh berry pieces or create a peach version using peach puree and a touch of cinnamon.
Fall Transformation: Incorporate warm spices like cinnamon, nutmeg, and a hint of maple extract for a cozy autumn dessert.
Winter Holiday Edition: Add eggnog flavoring and a sprinkle of nutmeg, or create a peppermint version perfect for Christmas celebrations.
Pairing Suggestions and Serving Ideas
The versatility of this cake extends to its pairing potential. I’ve served it successfully in numerous contexts, from casual family dinners to elegant dinner parties.
Beverage Pairings: Coffee and tea are natural companions, but I also love serving it with hot chocolate during winter months. For special occasions, a dessert wine or port complements the rich custard layers beautifully.
Accompaniment Ideas: Fresh fruit provides a lovely contrast to the rich custard. I particularly enjoy it with sliced strawberries, raspberry coulis, or caramelized pears. A simple fruit compote can elevate the presentation significantly.
Presentation Tips: Dust with powdered sugar just before serving for an elegant look. Garnish with fresh mint, edible flowers, or a few perfect berries. The cake photographs beautifully, making it perfect for special occasions you want to remember.
Q&A Section
Q: Why didn’t my cake develop three distinct layers? The most common cause is temperature issues with your ingredients. Make sure your milk is lukewarm (not hot) and your eggs are at room temperature. Also, check that your oven temperature is accurate – too high heat can prevent proper layer separation.
Q: Can I make this cake in a different sized pan? You can use a 9×9 inch pan, but the layers will be thinner. Reduce the baking time by about 10-15 minutes and watch carefully for doneness. I don’t recommend going smaller than 8×8 inches as the layers won’t develop properly.
Q: How do I know when the egg whites are whipped to the right consistency? Stiff peaks mean the whites hold their shape when you lift the beaters, forming peaks that don’t fold over. They should look glossy and smooth, not grainy or separated.
Q: Can I use low-fat milk instead of whole milk? While you can substitute low-fat milk, the custard layers won’t be as rich and creamy. Whole milk provides the fat content necessary for the proper texture and mouthfeel.
Q: Why does my cake have a slightly curdled appearance in the batter? This is completely normal! The batter will look somewhat separated or curdled when you add the milk to the egg mixture. This actually indicates you’re on the right track for proper layer development.
Q: How far in advance can I make this cake? The cake actually improves after a day in the refrigerator, so it’s perfect for making ahead. I often prepare it the day before serving. It will keep well for up to 3 days covered in the refrigerator.
Q: Can I double the recipe? Yes, but use a 9×13 inch pan and increase the baking time by 15-20 minutes. Watch carefully for the golden brown top and slight jiggle in the center to determine doneness.
Q: What should I do if my cake sinks in the middle after cooling? A slight settling is normal, but significant sinking usually indicates over-whipped egg whites or too high oven temperature. The cake is still delicious and the layers should still be distinct.
Q: Why is my top layer too thick compared to the custard layers? This typically happens when the egg whites are under-whipped or the folding technique was too aggressive, breaking down the air bubbles. Ensure you achieve stiff peaks and fold very gently.
Q: Can I add mix-ins like chocolate chips or fruit pieces? Small additions can work, but they may interfere with layer development. I recommend mastering the basic version first, then experimenting with small amounts of add-ins in the egg yolk mixture.
This magical dessert continues to amaze me every time I make it. The combination of simple ingredients, fascinating science, and absolutely delicious results makes it one of my favorite cakes to share with others. Whether you’re an experienced baker or just starting your culinary journey, mastering this Vanilla Magic Custard Cake will add a truly special dessert to your repertoire that never fails to impress and delight.