When I’m craving something sweet but don’t want to heat up my kitchen, I turn to my favorite no-bake dessert that always delivers stunning results. These Oreo dessert cups have become my go-to recipe for everything from casual family dinners to impressive dinner parties. The combination of creamy textures, rich chocolate flavors, and that satisfying crunch makes these individual treats absolutely irresistible.
What makes these dessert cups truly special is their foolproof nature. I’ve never had a batch fail, and the results are consistently elegant and delicious. The layered presentation creates a restaurant-quality dessert that requires no special equipment or advanced baking skills. Each spoonful delivers the perfect balance of smooth cream and cookie pieces that melt beautifully on your tongue.
Understanding the Magic Behind No-Bake Desserts
No-Bake Desserts : Frozen or chilled treats that achieve their final texture and flavor through refrigeration rather than oven baking, relying on binding agents like cream cheese, whipped cream, or gelatin.
Stabilization : The process by which ingredients like cream cheese and whipped topping maintain their structure when combined, creating a firm yet creamy texture without heat.
Layering Technique : A method of building desserts in clear containers to showcase distinct layers of different textures and flavors.
The science behind these desserts fascinates me. When I combine cream cheese with powdered sugar, the fat content creates a stable base that holds its shape beautifully. The addition of whipped topping introduces air, making the mixture light and fluffy while maintaining structural integrity. Meanwhile, the Oreo cookies provide textural contrast and intense chocolate flavor that permeates throughout each layer.
Essential Ingredients and Their Roles
My carefully tested recipe relies on specific ingredients that work together harmoniously. Each component serves a distinct purpose in creating the final masterpiece.
| Ingredient | Quantity | Primary Function | Substitution Options |
|---|---|---|---|
| Oreo Cookies | 36 cookies | Crust base and texture layers | Chocolate sandwich cookies, Newman-O’s |
| Cream Cheese | 8 oz (softened) | Structure and tangy richness | Mascarpone (sweeter result) |
| Powdered Sugar | 1 cup | Sweetness and smooth texture | Granulated sugar (blend until fine) |
| Heavy Whipping Cream | 2 cups | Lightness and volume | Cool Whip (8 oz container) |
| Vanilla Extract | 2 teaspoons | Flavor enhancement | Almond extract (use 1 tsp) |
| Butter | 4 tablespoons | Cookie crust binding | Coconut oil (melted) |
The quality of your cream cheese makes an enormous difference in the final texture. I always use full-fat cream cheese and ensure it’s completely softened before mixing. This prevents lumps and creates that silky smooth consistency I’m always after. Cold cream cheese will never blend properly, no matter how long you beat it.
Step-by-Step Preparation Method
Creating these dessert cups follows a logical sequence that builds flavor and texture systematically. I’ve refined this process through countless batches to eliminate common pitfalls.
Preparing the Cookie Components
I start by separating my Oreo cookies into two groups. The first batch becomes the crust layer, while the remaining cookies get chopped for mixing into the cream layer. For the crust, I remove the cream filling from 20 cookies and pulse the chocolate wafers in my food processor until they form fine crumbs. The texture should resemble coarse sand rather than powder.
Next, I melt butter and combine it with the cookie crumbs until the mixture holds together when pressed. This creates a stable foundation that won’t crumble when I add the cream layers above. I press this mixture firmly into the bottom of my serving cups, using the back of a spoon to create an even surface.
Creating the Perfect Cream Mixture
The cream layer requires attention to temperature and mixing technique. I beat my softened cream cheese until it’s completely smooth and fluffy, which usually takes about three minutes with an electric mixer. Gradually, I add powdered sugar, beating continuously to prevent lumps from forming.
In a separate bowl, I whip heavy cream with vanilla extract until stiff peaks form. The key is not overbeating, which would create butter rather than whipped cream. I fold this whipped cream into the cream cheese mixture using a gentle motion that preserves the airiness.
For the final touch, I fold in chopped Oreo pieces, reserving some for garnish. The cookies should be roughly chopped into pea-sized pieces that distribute evenly throughout the mixture.
Assembly and Presentation Techniques
| Layer | Thickness | Purpose | Pro Tips |
|---|---|---|---|
| Cookie Crust | 1/4 inch | Foundation stability | Press firmly, chill 15 minutes |
| First Cream Layer | 1/2 inch | Primary flavor base | Use piping bag for neat edges |
| Cookie Sprinkle | Light dusting | Texture contrast | Save some for final garnish |
| Second Cream Layer | 1/2 inch | Volume and richness | Level with offset spatula |
| Final Garnish | Variable | Visual appeal | Whole cookie pieces, crumbs |
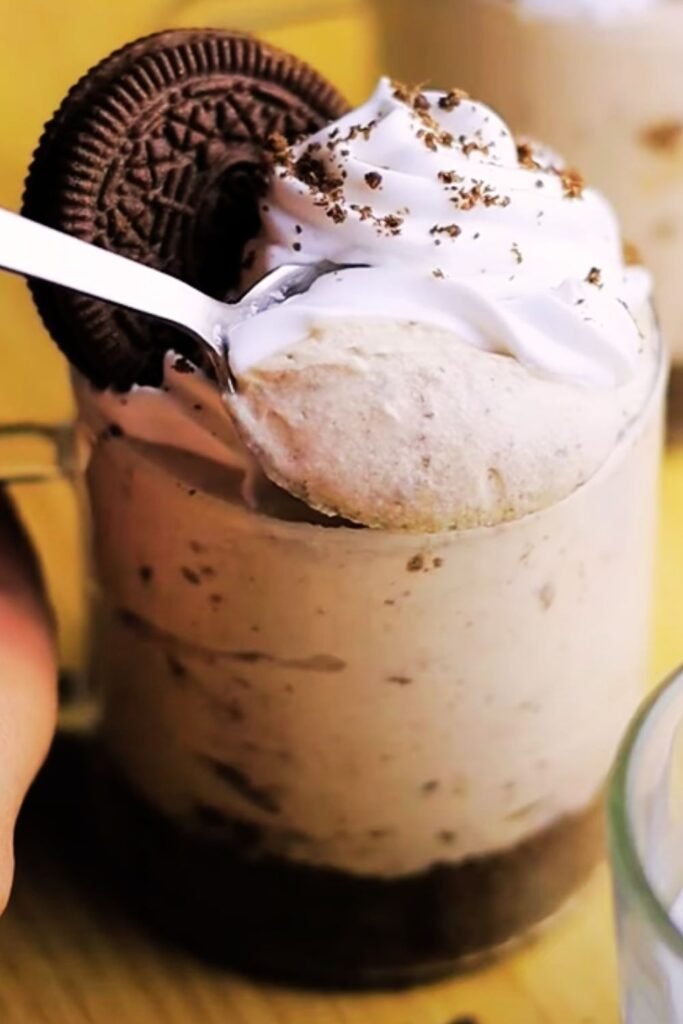
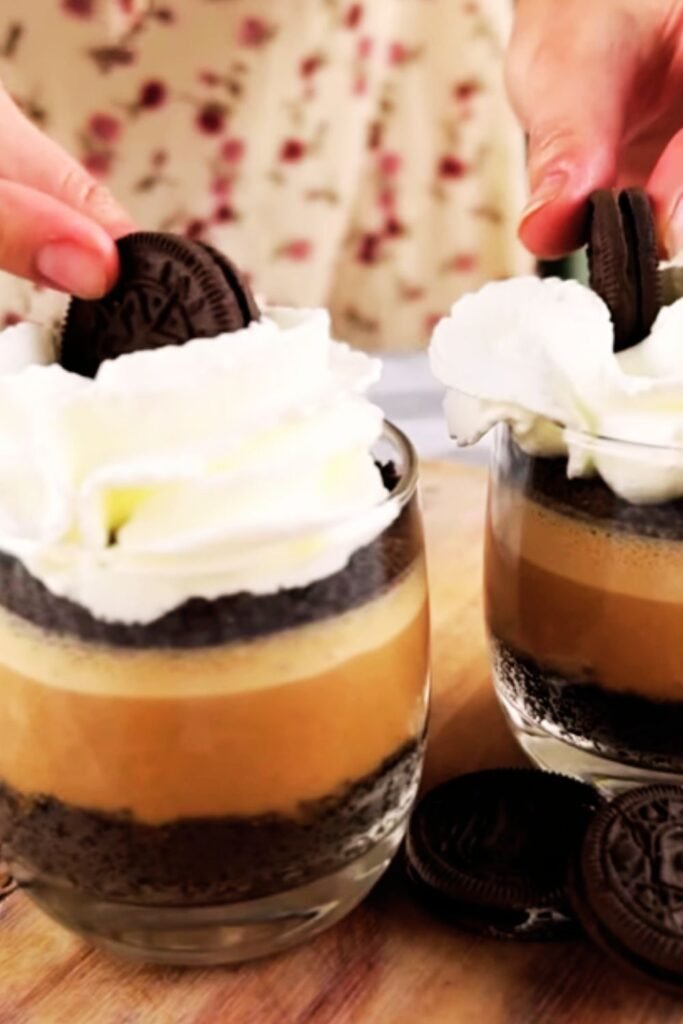
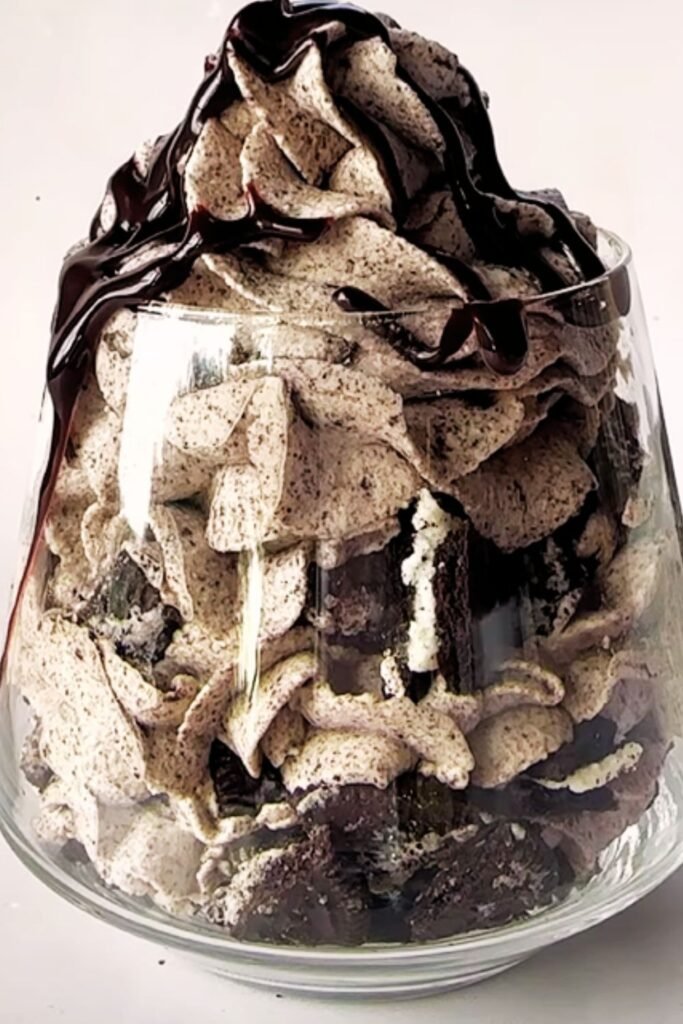
The assembly process determines both the visual impact and structural integrity of these desserts. I use clear glass cups or mason jars to showcase the beautiful layers, though any small containers work perfectly fine. Each layer should be distinct and even, creating that professional appearance I’m always striving for.
I’ve learned that chilling between layers isn’t always necessary, but it does help maintain clean separation lines. When I’m serving these for special occasions, I take the extra time to chill each layer for 30 minutes before adding the next one.
Customization and Flavor Variations
The basic recipe serves as an excellent foundation for creative variations that keep things interesting. I’ve experimented with numerous combinations over the years, and several have become regular favorites in my dessert rotation.
Flavor Variations
- Mint Chocolate: Add 1/2 teaspoon mint extract and green food coloring to the cream mixture
- Peanut Butter Supreme: Incorporate 1/2 cup creamy peanut butter into the cream base
- Coffee Mocha: Mix 2 tablespoons instant coffee with 1 tablespoon hot water, cool, and fold into cream
- Strawberry Twist: Layer fresh strawberry slices between cream layers
- Caramel Delight: Drizzle salted caramel sauce between layers
Each variation maintains the same basic technique while introducing new flavor profiles that complement the chocolate cookie base. The mint version has become particularly popular during summer months, while the peanut butter variation satisfies those intense chocolate-peanut butter cravings.
Storage and Make-Ahead Strategies
| Storage Method | Duration | Quality Notes | Best Practices |
|---|---|---|---|
| Refrigerated (covered) | 3-4 days | Optimal texture and flavor | Cover tightly, store upright |
| Frozen | 1 month | Texture changes slightly | Thaw in refrigerator 2 hours |
| Individual wrapping | 2 days | Prevents cross-contamination | Use plastic wrap or lids |
| Bulk storage | 3 days | Economical for large batches | Large covered container |
These dessert cups actually improve with time as the flavors meld together beautifully. I often prepare them a day ahead for parties, which allows the cookie pieces to soften slightly while maintaining their pleasant texture. The cream layers also set more firmly, making serving much easier.
For longer storage, I avoid freezing these desserts because the texture changes significantly. The cream becomes grainy after thawing, and the cookies lose their appealing contrast. Instead, I focus on refrigerated storage and plan my batches accordingly.
Troubleshooting Common Issues
Through years of making these desserts, I’ve encountered virtually every possible problem and developed reliable solutions. Most issues stem from temperature control or ingredient quality rather than technique errors.
Lumpy Cream Mixture : This almost always indicates cold cream cheese. Solution: Let cream cheese reach room temperature completely, or microwave in 10-second intervals until soft.
Runny Consistency : Usually caused by under-whipped cream or overripe cream cheese. Solution: Chill the mixture for 30 minutes, then re-whip gently.
Soggy Cookie Crust : Insufficient butter or inadequate pressing. Solution: Add melted butter gradually until mixture holds together when squeezed.
Separated Layers : Temperature shock or incompatible ingredients. Solution: Ensure all components are at similar temperatures before combining.
The most frequent mistake I see involves rushing the cream cheese softening process. Cold cream cheese creates lumps that never fully disappear, no matter how long you beat the mixture. I’ve learned to be patient with this step because it determines the entire dessert’s success.
Nutritional Considerations and Dietary Adaptations
| Component | Calories per Serving | Adaptations Available | Impact on Texture |
|---|---|---|---|
| Standard Recipe | 380-420 | None | Optimal |
| Reduced Fat | 280-320 | Light cream cheese, sugar-free pudding | Slightly less rich |
| Dairy-Free | 350-390 | Coconut cream, vegan cookies | Similar texture |
| Sugar-Free | 280-320 | Sugar substitutes, sugar-free cookies | Comparable sweetness |
I’ve successfully adapted this recipe for various dietary needs without sacrificing too much flavor or texture. The dairy-free version using coconut cream actually creates an interesting tropical undertone that many people prefer. However, I always test new adaptations thoroughly before serving them to guests.
For those managing sugar intake, I’ve found that erythritol-based sweeteners work better than stevia in this application. The texture remains closer to the original, and there’s no lingering aftertaste that might compete with the chocolate flavors.
Serving Suggestions and Presentation Ideas
The presentation possibilities for these dessert cups extend far beyond basic serving. I’ve developed several techniques that transform simple desserts into memorable experiences for different occasions.
For casual family dinners, I serve them directly in the preparation cups with simple spoons. However, for entertaining, I transfer them to elegant glassware and garnish with fresh berries, mint leaves, or a drizzle of chocolate sauce. The contrast between the dark cookies and white cream creates natural visual appeal that needs minimal enhancement.
During holiday seasons, I adapt the garnishes to match the theme. Halloween versions get orange-tinted cream and candy decorations, while Christmas versions feature red and green sprinkles with crushed candy canes. These seasonal touches make the same basic recipe feel completely different and special.
Equipment and Tools for Success
The beauty of no-bake desserts lies in their minimal equipment requirements, but having the right tools makes the process significantly easier and more enjoyable.
Essential Equipment
- Electric mixer (hand or stand mixer)
- Food processor or rolling pin for cookie crushing
- Clear serving cups or glasses
- Rubber spatula for gentle folding
- Measuring cups and spoons
- Large mixing bowls
Helpful Additions
- Piping bags for neat layering
- Offset spatula for smooth surfaces
- Fine-mesh sieve for powdered sugar
- Kitchen scale for precision
- Serving spoons or small scoops
I’ve made these desserts with minimal equipment when necessary, but having proper tools elevates both the process and final results. The food processor, in particular, creates more consistent cookie crumb texture than manual crushing methods.
Advanced Techniques for Perfect Results
After perfecting the basic recipe, I’ve developed several advanced techniques that push these desserts from good to exceptional. These methods require minimal additional effort but create significantly better results.
Temperature Control : I maintain all ingredients at consistent room temperature, which prevents mixture separation and ensures smooth blending. Cold ingredients create lumps and texture issues that are difficult to correct later.
Whipping Technique : I whip cream in a chilled bowl with chilled beaters, which creates more stable peaks and better volume. Over-whipped cream becomes grainy and separated, so I stop beating as soon as stiff peaks form.
Folding Method : When combining whipped cream with cream cheese mixture, I use a folding motion rather than stirring. This preserves the air bubbles that create light, fluffy texture.
Cookie Distribution : I reserve the best-looking cookie pieces for visible layers and use smaller pieces for mixing into the cream. This creates better visual appeal while maintaining consistent texture throughout.
Frequently Asked Questions
Q: Can I make these dessert cups without a food processor for the cookie crumbs?
Absolutely! I often use a rolling pin and sealed plastic bag method. Simply place the cookies in a sturdy zip-lock bag, seal it tightly, and roll over them with a rolling pin until they reach the desired consistency. This takes a bit more effort but produces excellent results. You can also use a hammer wrapped in a towel for quicker crushing.
Q: How far in advance can I prepare these desserts?
I’ve found they taste best when made 4-24 hours ahead of serving. The flavors meld beautifully during this time, and the texture becomes perfectly set. I wouldn’t recommend making them more than 3 days in advance, as the cookies begin to lose their appealing texture contrast.
Q: What’s the best way to transport these desserts to a party?
I use individual cups with tight-fitting lids and transport them in a cooler with ice packs. Mason jars work particularly well for transport because they seal completely and stack efficiently. I also bring extra garnishes separately and add them just before serving to maintain the best appearance.
Q: Can I substitute the heavy cream with a lighter alternative?
While you can use lighter alternatives, the texture will change significantly. I’ve tried using half-and-half or milk, but the mixture becomes much thinner and doesn’t hold its shape as well. Cool Whip or similar whipped toppings work better as substitutes if you’re looking to reduce calories.
Q: Why does my cream mixture sometimes turn out grainy?
Graininess usually results from cold cream cheese or over-whipping. Make sure your cream cheese is completely softened to room temperature before mixing. If it’s already grainy, try warming the mixture slightly and re-whipping gently. Sometimes adding a tablespoon of warm milk helps smooth out the texture.
Q: Can I use different types of cookies instead of Oreos?
Definitely! I’ve experimented with chocolate graham crackers, vanilla wafers, and even gingersnaps. Each creates a different flavor profile while maintaining the same basic technique. Chocolate sandwich cookies work best because they provide both the cookie element and complement the cream layers.
Q: How do I prevent the layers from mixing together?
The key is proper consistency in your cream mixture and gentle layering technique. If your cream is too thin, it will sink into the cookie layer. I use a large spoon and pour the cream slowly over the back of the spoon to distribute it gently. Chilling between layers also helps maintain separation.
Q: What’s the best garnish for special occasions?
For elegant presentations, I love using fresh berries, mint leaves, or a light dusting of cocoa powder. Chocolate shavings made with a vegetable peeler create a sophisticated look. For children’s parties, colorful sprinkles or mini chocolate chips work wonderfully.
These no-bake Oreo dessert cups represent everything I love about simple, reliable recipes that deliver impressive results. They’ve become my signature dessert for good reason – they’re foolproof, delicious, and endlessly adaptable to different tastes and occasions. Whether you’re a beginner looking for an easy success or an experienced cook wanting a reliable crowd-pleaser, this recipe will quickly become one of your favorites. The combination of rich, creamy textures with satisfying cookie crunch creates a dessert that satisfies every craving while looking absolutely beautiful on any table.