When I first discovered the magic of oven-fried potatoes and onions, my kitchen game changed forever. This isn’t just another potato recipe – it’s a revelation that transforms humble ingredients into something extraordinary. The combination of golden, crispy potatoes paired with caramelized onions creates a symphony of textures and flavors that’ll have your family asking for seconds before they’ve finished their first helping.
What makes this dish so special is its simplicity paired with incredible results. Unlike traditional fried potatoes that require constant attention and loads of oil, oven-frying gives you that coveted crispy exterior while keeping the inside fluffy and tender. The onions add a sweet, savory depth that complements the earthiness of the potatoes perfectly.
I’ve been perfecting this recipe for years, tweaking temperatures, testing different potato varieties, and experimenting with seasoning combinations. The result is a foolproof method that delivers restaurant-quality results every single time.
Understanding the Science Behind Perfect Oven-Fried Potatoes
The key to exceptional oven-fried potatoes lies in understanding the science behind what makes them crispy. When potatoes are exposed to high heat, the starches on their surface convert to sugars and then caramelize, creating that golden-brown crust we all crave. The moisture inside the potato creates steam, which keeps the interior fluffy while the exterior crisps up.
Maillard Reaction: This chemical reaction between amino acids and reducing sugars occurs when proteins and sugars are heated together, creating complex flavors and that beautiful golden color.
Starch Gelatinization: When heated with moisture, potato starches swell and burst, creating the fluffy interior texture we love.
Caramelization: The natural sugars in both potatoes and onions caramelize under high heat, developing rich, complex flavors.
Choosing the Right Potatoes
Not all potatoes are created equal when it comes to oven-frying. I’ve tested dozens of varieties, and here’s what I’ve learned:
Russet Potatoes: These are my go-to choice. Their high starch content creates incredibly fluffy interiors while developing excellent crispy exteriors. The thick skin also holds up well during the cooking process.
Yukon Gold: These waxy potatoes offer a creamier texture and hold their shape beautifully. They’re perfect if you prefer a more buttery flavor and slightly firmer texture.
Red Potatoes: While they don’t get quite as crispy as russets, they offer a wonderful earthy flavor and hold their shape exceptionally well.
Fingerling Potatoes: These specialty potatoes are perfect for elegant presentations and offer unique flavors depending on the variety.
Essential Ingredients and Their Roles
| Ingredient | Quantity | Purpose | Quality Tips |
|---|---|---|---|
| Russet Potatoes | 3 lbs | Main component | Choose firm potatoes without green spots |
| Yellow Onions | 2 large | Sweetness and depth | Look for firm onions with dry, papery skins |
| Olive Oil | 1/4 cup | Crispiness and flavor | Use extra virgin for best flavor |
| Garlic Powder | 2 tsp | Aromatic depth | Fresh is preferable, but powder works well |
| Paprika | 1 tbsp | Color and mild heat | Hungarian paprika offers the best flavor |
| Salt | 2 tsp | Flavor enhancement | Sea salt or kosher salt work best |
| Black Pepper | 1 tsp | Heat and complexity | Freshly ground pepper is essential |
| Fresh Thyme | 2 tbsp | Herbal notes | Can substitute with 1 tbsp dried thyme |
| Butter | 2 tbsp | Richness and browning | Unsalted butter allows better control |
Step-by-Step Preparation Method
Preparation Phase (15 minutes)
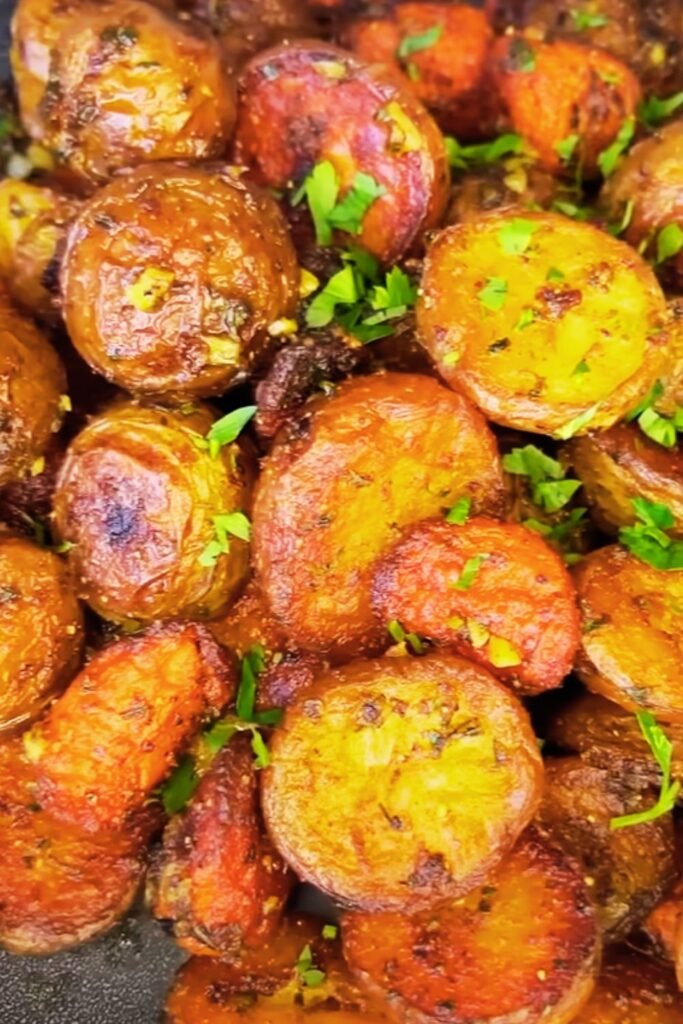
Potato Preparation: Start by washing your potatoes thoroughly under cold running water. I prefer to leave the skins on for added nutrition and texture, but you can peel them if desired. Cut the potatoes into uniform 1-inch cubes to ensure even cooking.
Onion Preparation: Peel your onions and cut them into thick slices, about 1/2 inch thick. The key is keeping them substantial enough that they won’t burn before the potatoes are done.
Seasoning Mix: In a small bowl, combine all your dry seasonings. This ensures even distribution throughout the dish.
Cooking Process (45-50 minutes)
Preheating: Set your oven to 425°F (220°C). This high temperature is crucial for achieving that perfect crispy exterior.
Initial Preparation: In a large bowl, toss the cut potatoes with half of the olive oil and about two-thirds of your seasoning mixture. Make sure every piece is well-coated.
Pan Setup: Use a large, heavy-duty baking sheet or two smaller ones. Overcrowding will result in steaming rather than crisping.
First Roasting Phase: Spread the seasoned potatoes in a single layer on your prepared baking sheet. Roast for 25 minutes without stirring.
Adding Onions: Remove the pan from the oven and add the sliced onions, drizzling with the remaining olive oil and seasoning. Toss gently to combine.
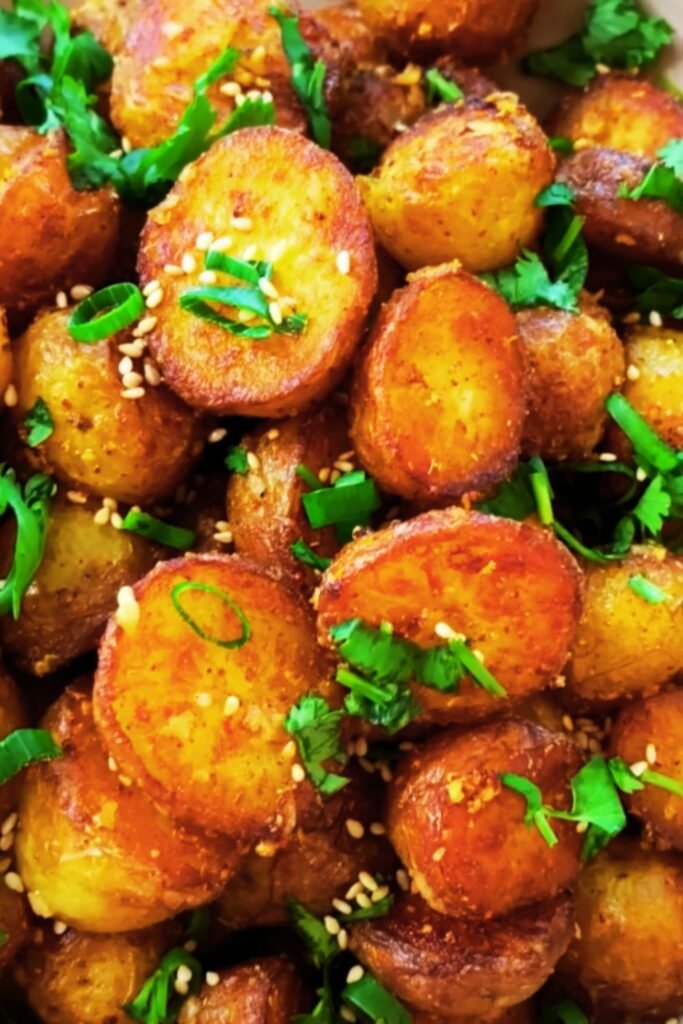
Final Roasting: Return to the oven for another 20-25 minutes, stirring once halfway through, until potatoes are golden brown and crispy.
Finishing Touch: During the last 5 minutes, add small pieces of butter and fresh thyme for extra richness and flavor.
Temperature and Timing Guide
| Cooking Phase | Temperature | Time | Visual Cues |
|---|---|---|---|
| Initial Roast | 425°F (220°C) | 25 minutes | Edges starting to brown |
| With Onions | 425°F (220°C) | 20-25 minutes | Golden brown, crispy edges |
| Final Browning | 425°F (220°C) | 5 minutes | Deep golden color |
| Resting | Room temp | 5 minutes | Allows steam to escape |
Seasoning Variations and Flavor Profiles
Over the years, I’ve developed several signature seasoning blends that transform this basic recipe into something special:
Mediterranean Blend: Add dried oregano, rosemary, and a pinch of red pepper flakes for a taste of the Mediterranean coastline.
Southwest Style: Incorporate cumin, chili powder, and smoked paprika for a warm, earthy flavor with a gentle kick.
Herb Garden: Fresh or dried herbs like rosemary, thyme, and sage create an aromatic profile that’s perfect for fall and winter meals.
Garlic Lover’s: Double the garlic powder and add fresh minced garlic during the last 10 minutes of cooking for an intense garlic flavor.
Smoky Barbecue: Smoked paprika, onion powder, and a touch of brown sugar create a barbecue-inspired flavor profile.
Troubleshooting Common Issues
Problem: Potatoes aren’t getting crispy
- Solution: Make sure your oven is fully preheated and you’re not overcrowding the pan. Also, ensure potatoes are dry before seasoning.
Problem: Onions are burning
- Solution: Add them later in the cooking process or cut them into thicker pieces. You can also tent them with foil if they’re browning too quickly.
Problem: Uneven cooking
- Solution: Cut all pieces to the same size and stir once during cooking to ensure even browning.
Problem: Potatoes are too salty
- Solution: Serve with a dollop of sour cream or yogurt to balance the saltiness.
Nutritional Information and Health Benefits
Oven-fried potatoes and onions offer more than just great taste – they’re packed with nutrients that support your health:
| Nutrient | Per Serving | Daily Value % | Health Benefits |
|---|---|---|---|
| Vitamin C | 28mg | 31% | Immune system support |
| Potassium | 897mg | 19% | Heart health, blood pressure |
| Fiber | 4.2g | 15% | Digestive health |
| Vitamin B6 | 0.5mg | 25% | Brain function, metabolism |
| Folate | 23mcg | 6% | Cell division, DNA synthesis |
| Iron | 1.8mg | 10% | Oxygen transport |
Potatoes are an excellent source of complex carbohydrates, providing sustained energy without the blood sugar spikes associated with simple carbs. They’re also rich in potassium, which helps regulate blood pressure and supports heart health.
Onions contain quercetin, a powerful antioxidant that may help reduce inflammation and support immune function. They also provide prebiotic fiber that feeds beneficial gut bacteria.
Serving Suggestions and Pairings
These oven-fried potatoes and onions are incredibly versatile and pair beautifully with a wide range of main dishes:
Breakfast Applications: Serve alongside scrambled eggs, bacon, and toast for a hearty breakfast that’ll keep you satisfied all morning.
Lunch Options: Add them to a grain bowl with roasted vegetables and your favorite protein for a nutritious, filling lunch.
Dinner Companions: They’re the perfect side dish for grilled chicken, roasted beef, or baked fish. The crispy texture provides a wonderful contrast to tender proteins.
Vegetarian Meals: Top with fresh herbs, crumbled cheese, or a fried egg for a satisfying vegetarian main course.
Holiday Gatherings: This dish is perfect for potluck dinners and holiday gatherings because it can be made in large batches and stays delicious even when kept warm.
Storage and Reheating Instructions
Refrigeration: Store leftover oven-fried potatoes and onions in the refrigerator for up to 4 days in an airtight container.
Freezing: While they can be frozen for up to 3 months, the texture will be softer after thawing. I recommend freezing them before the final browning stage for best results.
Reheating Methods: The best way to reheat these potatoes is in a 400°F oven for 8-10 minutes, which helps restore some of the crispiness. You can also use an air fryer at 375°F for 5-6 minutes.
Make-Ahead Tips: You can prep the potatoes and onions up to 24 hours in advance. Store them separately in the refrigerator and combine them just before cooking.
Equipment Recommendations
The right equipment makes all the difference in achieving perfect results:
Heavy-Duty Baking Sheets: Invest in quality, heavy-gauge aluminum baking sheets that won’t warp at high temperatures.
Large Mixing Bowls: You’ll need plenty of space to toss the potatoes and onions with oil and seasonings.
Sharp Knife: A good chef’s knife makes prep work faster and ensures uniform cuts.
Measuring Tools: Accurate measurements ensure consistent results every time.
Oven Thermometer: Verify that your oven temperature is accurate for optimal cooking results.
Recipe Variations for Special Diets
Vegan Version: Simply omit the butter or replace it with vegan butter or additional olive oil. The dish is naturally vegan-friendly otherwise.
Low-Sodium Option: Reduce the salt by half and boost flavor with additional herbs and spices like garlic powder, onion powder, and smoked paprika.
Keto-Friendly Alternative: While traditional potatoes aren’t keto-friendly, you can substitute with radishes or turnips for a lower-carb version.
Whole30 Compliant: This recipe is already Whole30 compliant when you omit the butter and ensure all seasonings don’t contain additives.
Seasonal Adaptations
Spring: Add fresh asparagus or peas during the last 15 minutes of cooking for a seasonal twist.
Summer: Incorporate cherry tomatoes and fresh basil for a bright, summery flavor profile.
Fall: Add chunks of butternut squash or sweet potatoes for a harvest-inspired variation.
Winter: Include root vegetables like carrots and parsnips for a heartier, more substantial dish.
Questions and Answers
Q: Can I use sweet potatoes instead of regular potatoes? A: Absolutely! Sweet potatoes work wonderfully in this recipe. They’ll caramelize more quickly due to their higher sugar content, so keep an eye on them and reduce the cooking time by about 10 minutes.
Q: What’s the best way to cut the potatoes for even cooking? A: I recommend cutting them into uniform 1-inch cubes. This size ensures they cook through completely while still developing a crispy exterior. Avoid cutting them too small, as they’ll become mushy.
Q: Can I prepare this dish ahead of time for entertaining? A: Yes! You can prep all the ingredients up to 24 hours in advance. Store the cut potatoes in cold water to prevent browning, and keep the onions and seasoning mixture separate. Combine everything just before cooking for best results.
Q: Why do my potatoes sometimes turn out soggy instead of crispy? A: The most common cause is overcrowding the pan or not having the oven hot enough. Make sure your potatoes are in a single layer with space between them, and ensure your oven is fully preheated to 425°F.
Q: Can I use frozen potatoes for this recipe? A: While you can use frozen potatoes, fresh ones will give you much better results. If you must use frozen, make sure they’re completely thawed and patted dry before seasoning and cooking.
Q: How do I know when the potatoes are done? A: Look for a deep golden-brown color and crispy edges. They should be tender when pierced with a fork but still hold their shape. The onions should be caramelized and slightly crispy around the edges.
Q: What type of onions work best for this recipe? A: Yellow onions are my top choice because they caramelize beautifully and provide the perfect balance of sweetness and sharpness. Red onions work well too and add a lovely color, while white onions offer a milder flavor.
Q: Can I add other vegetables to this dish? A: Definitely! Bell peppers, mushrooms, and zucchini all work well. Just keep in mind that different vegetables have different cooking times, so you may need to add them at different stages of the cooking process.
Q: How can I make this dish spicier? A: Add cayenne pepper, red pepper flakes, or diced jalapeños to the seasoning mixture. You can also drizzle with hot sauce just before serving for an extra kick.
Q: Is it necessary to peel the potatoes? A: Not at all! I prefer to leave the skins on because they add nutrition, texture, and help the potatoes hold their shape during cooking. Just make sure to scrub them thoroughly before cutting.
This oven-fried potatoes and onions recipe has become one of my most requested dishes, and for good reason. It’s simple enough for a weeknight dinner but impressive enough for company. The combination of crispy exteriors, fluffy interiors, and caramelized onions creates a side dish that’s anything but ordinary.
The beauty of this recipe lies in its adaptability. Once you master the basic technique, you can customize it with different seasonings, vegetables, and serving styles to suit any meal or occasion. Whether you’re serving it for breakfast, lunch, or dinner, this dish never fails to satisfy.
Remember, the key to success is high heat, proper spacing, and patience. Don’t be tempted to move the potatoes around too much – let them develop that beautiful golden crust before stirring. With practice, you’ll develop an intuition for when they’re perfectly done.
I hope this recipe brings as much joy to your kitchen as it has to mine. There’s something deeply satisfying about transforming simple ingredients into something so delicious and comforting. Happy cooking!